In this guide, you will learn everything you need to know about Docker Swarm and how to use it to scale and securely maintain your Docker projects.
With applications needing more and more computing resources and uptime of nearly 100% it becomes very hard to maintain and scale your software without some kind of management system. This is where Docker swarm comes into play. Docker Swarm provides an easy way to scale and maintain your containers and services.
This guide will show you all the important concepts, commands and the structure of the configuration file. It will also give a real-world example of how you can deploy a real-world application at the bottom of the article.
Table of contents
Open Table of contents
Why care about Docker Swarm?
Before we get into the technical details about what a Swarm actually is and where it can help us let’s discuss why someone would use it in the first place.
Load balancing
Swarm has a built-in load balancer that lets you specify how to distribute service and container between your different nodes. You can also expose ports for external load balancing services.
Integrated into the Docker Engine
Swarm is directly integrated into the Docker CLI and doesn’t require any additional orchestration software or other tools to create or manage a swarm.
Scaling
Swarm lets you define the number of tasks you want to run for each service. This number can be changed using a single command which is handled by the swarm manager.
Rolling updates
Swarm lets you apply service updates incrementally which means that it updates a specific amount of replicas at a time and your service will always be up even while updating.
What is a Swarm?
Docker Swarm is a cluster management and orchestration tool that makes it easy to scale and manage your already existing docker services. A swarm consists of multiple Docker hosts that run in the so-called swarm mode and act eighter as managers (managing member relationships) or as workers (run the services). A given Docker host can be a manager, worker or can perform both roles.
When creating a service in a swarm you define the optimal state of your service (number of replicas, ports of the service, network and storage resources, and more). Docker will try to maintain this desired state by restarting/rescheduling unavailable tasks and balancing the load between different nodes.
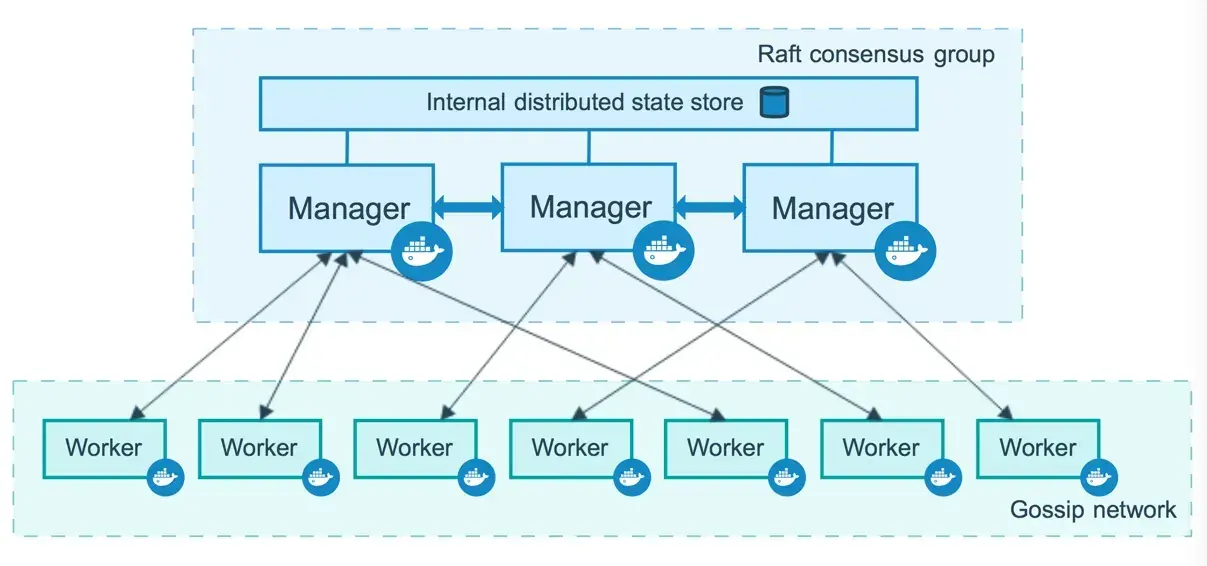
Nodes
A node is an instance of the Docker engine participating in the swarm. You can run one or multiple nodes on a single device, but production deployments typically include Docker nodes distributed across multiple physical devices.
Src:https://docs.docker.com/engine/swarm/how-swarm-mode-works/nodes/
Managers Nodes
Manager nodes distribute and schedule incoming tasks onto the Worker nodes, maintain the cluster state and perform orchestration and cluster management functions. Manager Nodes can also optionally run services for Worker nodes.
Cluster management tasks include:
- Maintaining the cluster state
- Scheduling services
- Serving swarm mode to HTTP API endpoints
There should always be multiple manager nodes in your swarm because of the following reasons:
- Maintaining high availability
- Easily recover from a manager node failure without downtime
That is why Docker recommends you implement an odd number of nodes according to your projects availability requirements.
Note: Docker recommends a maximum of seven manager nodes for a swarm.
Worker Nodes
Worker nodes are also instances of the Docker Engine whose sole purpose is to execute containers and services as instructed by the Manager Nodes.
To deploy your application to a swarm, you need at least one manager node. By default, all manager nodes are also workers. To prevent the scheduler from placing tasks on your manager node in a multi-node swarm, you need to set the availability to Drain.
Services
A service is the definition of the tasks to execute on the nodes. It is the primary root of user interaction with the swarm.
When you create a service, you specify which container image to use and which commands to execute inside running containers. You also define other options for the service including:
- the port you want to expose
- CPU and memory limitations
- the number of replicas of the image to run in the swarm
- a rolling update policy
Here is an example of an HTTP server balancing its load on three replicas:
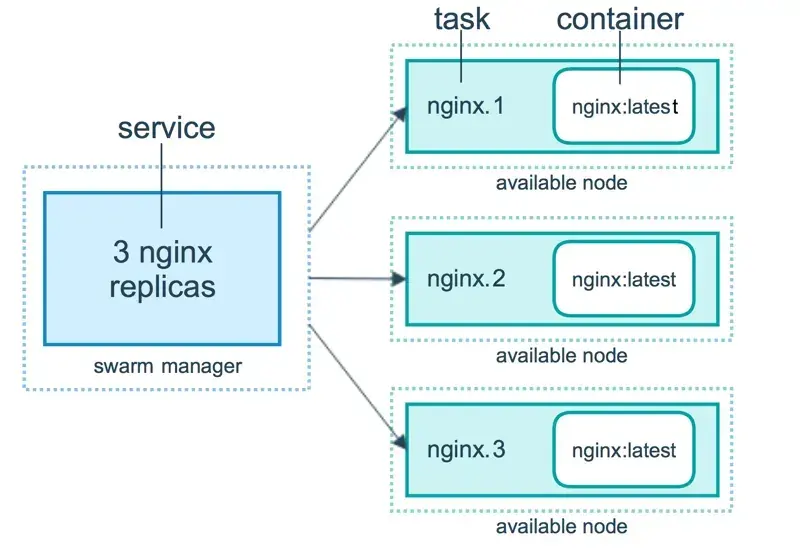
Src: https://docs.docker.com/engine/swarm/how-swarm-mode-works/services/
As you can see the service has three different tasks and each task invokes exactly one container. A task represents a slot where the scheduler can place a container. Once the container is live, the scheduler recognizes that the task is in a running state.
Task scheduling
A task carries a Docker container and the command that is executed inside the container. It is the atomic scheduling unit of the swarm. Tasks are assigned by the manager node to worker nodes according to the number of replicas set in the service.
When a service is created or updated, the orchestrator realizes the desired state by scheduling tasks. Each task is a slot that the scheduler fills by spawning a container which is the instantiation of a task. Now when one of these containers fails its health check or crashes, the orchestrator creates a new replica task that spawns a new container to replace the failing one.
The diagram below shows you how swarm mode accepts services and schedules tasks for the worker nodes.
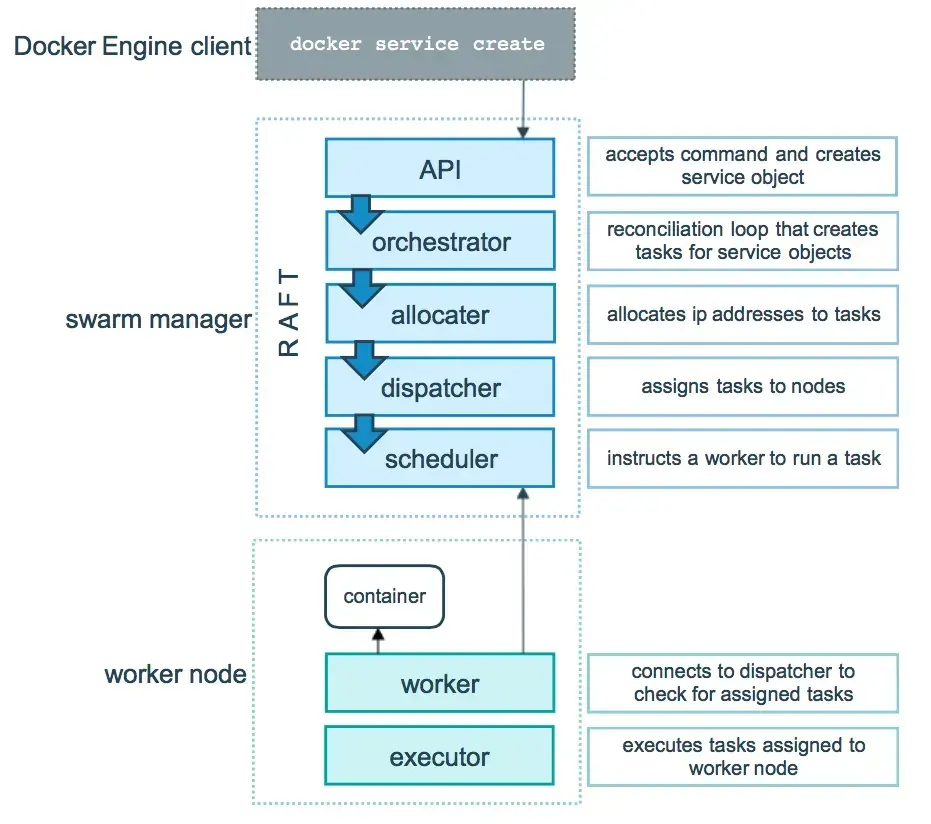
Src: https://docs.docker.com/engine/swarm/how-swarm-mode-works/services/
Replicated and global services
There are two different ways you can deploy a service, replicated and global.
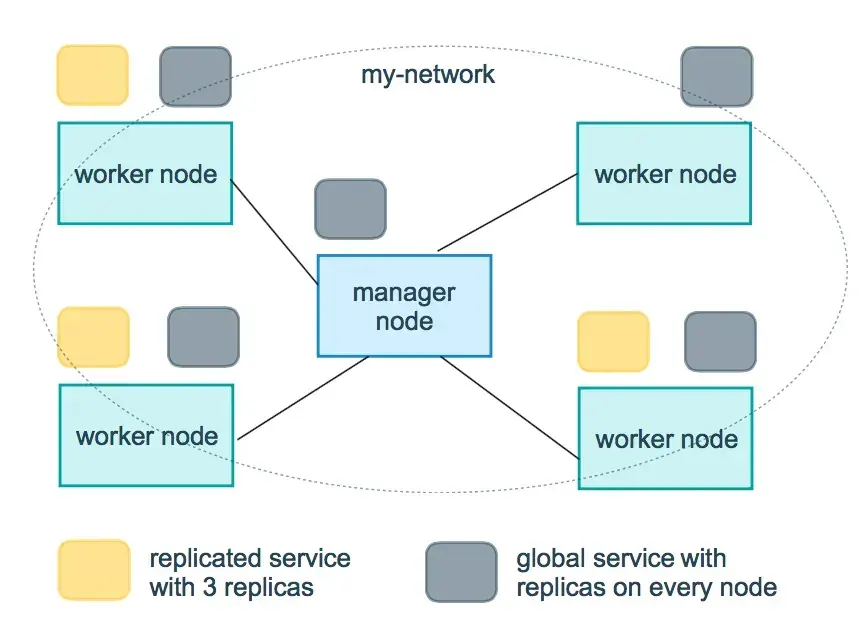
Replicated services specify the number of identical tasks (replicas) you want to run. These replicas will then be split up on the different worker nodes and each serves the same content.
A global service is a service that runs one task on every node you have in your swarm and doesn’t need a pre-specified number of tasks. Global services are usually used for monitor agents or any other type of container that you want to run on every node.
Here is a visual representation of a three-service replica and a global service.
Src: https://docs.docker.com/engine/swarm/how-swarm-mode-works/services/
Getting started
Now that you know the key concepts of Docker swarm we can continue by learning the basics about creating and managing a cluster.
Installation
Swarm can be run on nearly any operating system and is very easy to install so let’s get into it.
Windows and Mac:
Compose is included in the Windows and Mac Desktop installation and doesn’t have to be installed separately. The installation instructions can be found here:
Linux:
If you are using a physical Linux machine or cloud hosting service as a host, simply follow the installation instructions provided by Docker.
Creating a Swarm
The first step after installing Docker on your machine is creating a swarm. For that, we need to run the following command.
docker swarm init --advertise-addr <MANAGER-IP>The MANAGER-IP is the IP that the Swarm node manager will use to advertise the Swarm Cluster Service (If you are using Docker Desktop for Mac or Docker Desktop for Windows to test single-node swarm, simply run docker swarm init with no arguments).
Add nodes to swarm
With the swarm cluster created, we can now add a new node worker using the docker command provided by the output of the command above.
docker swarm join --token SWMTKN-1-41r5smr3kgfx780781xxgbenin2dp7qikfh9eketc0wrhrkzsn-8lbew6gpgxwd5fkn52l7s6fof 192.168.65.3:2377The node will join the swarm as a worker node. If you want to give it manager privileges you either need to promote it or use another invite token.
The invite token can be displayed using the following command:
docker swarm join-token managerViewing the current nodes
The status of the current node in your swarm can be verified using the node ls command.
docker node lsFrom the output of the command, you will see that your node is active and ready to use.
Promoting or demoting a node
You can promote or demote a node to the manager or worker role. This is useful if a special node is unavailable and you need to replace it.
# Promote node to manager
docker node promote docker-node

# Demote node to worker
docker node promote docker-node
You can also change roles using the update command.
docker node update --role manager docker-nodeLeaving the swarm
A node can leave the swarm on their own or be removed by a manager node
# Leaving the swarm
docker swarm leave

#Removing a node from the swarm
docker node rm worker1
Deploy a service
After creating a swarm and adding your node to it you can proceed by running a service on it.
docker service create --replicas 4 --name hellogoogle alpine ping google.comHere we create a service using the service create command and the following options:
replicas- this flag specifies the desired state of running instances (4 in this example)name- defines the name of the service
After that you can use the service ls command to list all running services:
docker service ls

Output:
ID                  NAME                MODE                REPLICAS            IMAGE               PORTS
uebs1viyktap        hellogoogle         replicated          4/4                 alpine:latest
Scale a service
Now that you have a service running on your swarm you can scale the number of containers and services.
docker service scale <SERVICE-ID>=<NUMBER-OF-TASKS>
# For our example
docker service scale hellogoogle=10
This command will scale the number of replicas to 10.
Inspect a service
You can get the details of your service using the inspect command.
docker service inspect SERVICE_NAMEThe output can also be customized by using extra tags like the —pretty tag to make the output more readable.
Deleting a service
Services can be removed using the rm command.
docker service rm hellogoogleUpdating a service
Docker swarm also lets you perform a rolling update on your running services. Rolling updates have the following advantages:
- No downtime (Because it only updates a specific amount of replicas at a time)
- Updates can be paused when an error occurs
Basic updates:
Updates are performed using the docker service update command:
# Create a service
docker service create --name nginx --replicas 3 --update-delay 10s nginx:mainline

# Updating the image
docker service update --image nginx:stable nginx
Update-order:
Defines if the new container starts before the old one is killed or otherwise.
docker service update -d --update-order start-first nginxParallelism:
This flag will tell Swarm how many tasks it will update in parallel.
docker service update --update-parallelism 3 nginxDefining a rollback
Docker swarm allows you to automatically rollback to previous versions of your services.
docker service rollback nginxThey can also automatically be executed when an error occurs in the update process.
docker service update --detach=false --update-failure-action rollback nginxFor more information visit the official documentation.
Drain a node
Drain availability prevents a node from receiving new tasks from the swarm. It also stops all tasks running on the node and launches replica tasks on the other available node with an active availability.
docker node update --availability drain worker1Inspect the node:
You can inspect the node to see its availability:
docker node inspect --pretty worker1Update it back to active:
After you have made the required changes on your node and are ready to enable it again.
docker node update --availability active worker1Routing mesh
The routing mesh is a cluster-wide transport-layer (L4) load balancer that routes all incoming requests in the swarm to published ports of an available container on a node. It allows all the swarm nodes to accept connections on the services published ports.
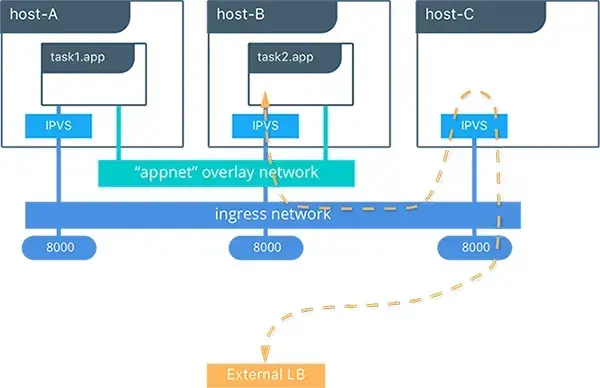
Src: https://success.docker.com/article/ucp-service-discovery-swarm
You can publish a port using the —publish flag or the short version -p:
docker service create -p 80:80 --name nginx --replicas 3 nginx:mainlineMore information about how you can bypass the routing mesh and configure an external load balancer can be found on the official documentation.
Service logs
Logging is a very important topic for containerized applications and is also handled in Docker swarm.
Get the logs of a service:
Getting the logs of a service is very similar to getting the logs of a single container.
docker service logs hellogoogleFollowing the logs:
You can also get a real-time view of your logs using the —follow flag.
docker service logs --follow hellogoogleYou can also use a custom logging driver or customize the output you get by the docker service logs command using more flags.
Manage sensitive data using secrets
A secret is a piece of data that should not be transmitted over a network or stored unencrypted. Docker provides a service to centrally manage such data and securely transmit it to only those containers that need access to it.
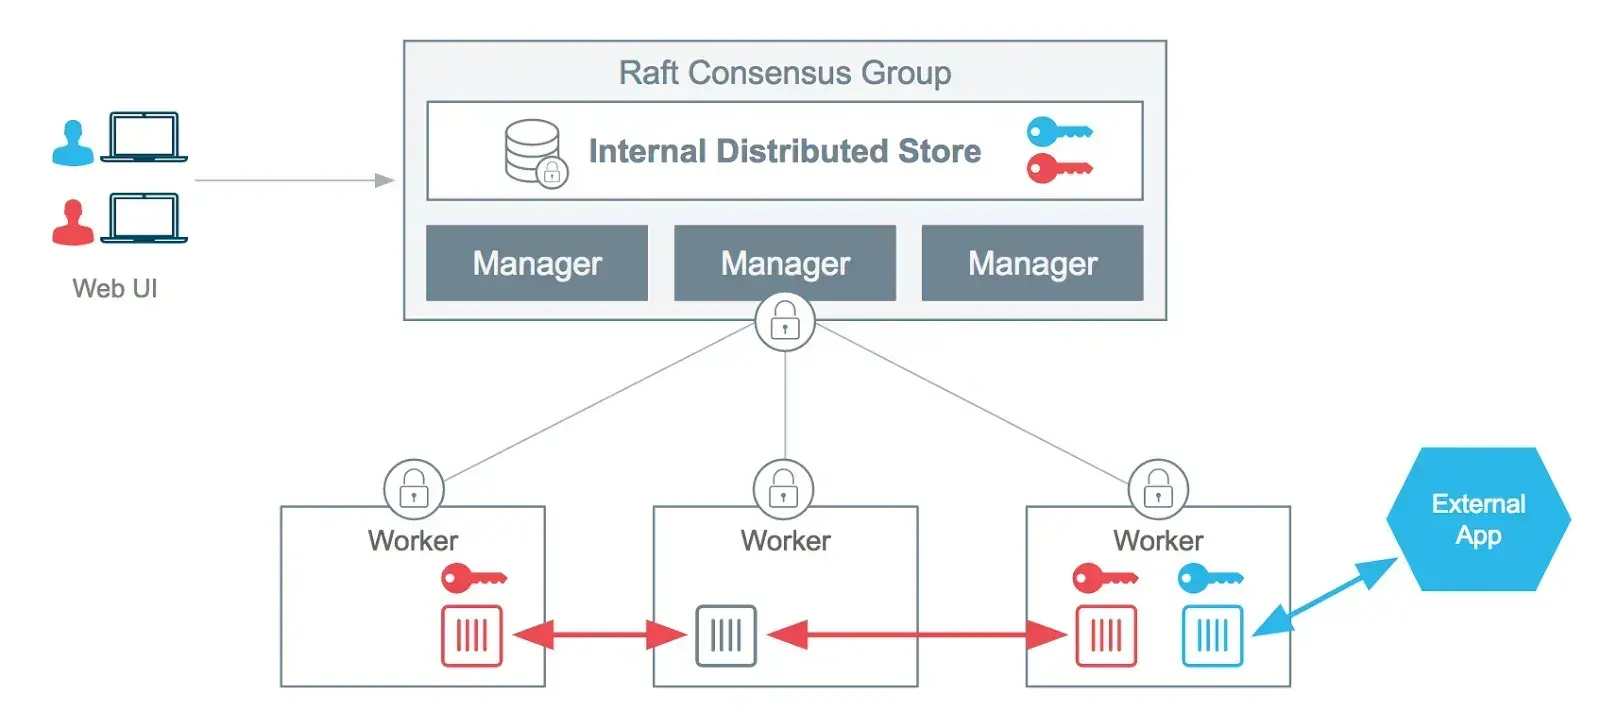
Src: https://www.docker.com/blog/docker-secrets-management/
Secrets can be created, inspected and removed via the command line using the following commands.
Managing a secret
We can create a secret using the secret create command which has two parameters: the name of the secret and the secret itself.
echo "Secret" | docker secret create my_secret -After creating the secret you can inspect it or display all secrets that are available on your machine.
# List all secrets
docker secret ls

# Inspect a specific secret
docker inspect SECRET_NAME
Lastly, you can remove a secret using the secret rm command.
docker secret rm my_secretPassing a secret to a service
Secrets can be added to services on creating or while the containers are running using the following commands.
The --secret tag can be used to add a secret while creating a service.
docker service create --name="nginx" --secret="my_secret" nginx:latestAdding and removing secrets from running services can be done using the --secret-add and --secret-rm tags on the service update command.
docker service update --secret-rm="my_secret" nginxCheck out the docker secrets documentation for more information.
Limiting resources
Limiting the resources your services can access is a vital part of a container orchestration tool. Swarm makes this easy by providing tags that can be added to your service commands.
--limit-cpu- Takes a decimal number as an argument and limits the CPU resources of a service--limit-memory- Takes a number of bytes as an argument e.g. 2G and limits the memory usage to that value--reserve-cpu- Reserves a specific amount of CPU resources for the service--reservce-memory- Reserves a specific amount of memory resources for the service
Here is an example of how you could use these tags:
docker service create --name=nginx --limit-cpu 0.1 --limit-memory 1G nginx:latestYou can check the limitations of your service using the inspect command.
docker service inspect --pretty nginxMore information about limiting resources of services can be found in the documentation.
Labels
Adding labels to your nodes and services can be really helpful when having a big cluster and makes tasks like filtering easier.

The —label-add tag can be used to add a new label to an already existing node.
docker node update --label-add <key>=<value> <node-id>Labels can also be added to services and containers which I will not go into in this article but you find more information in the official documentation or the docker service command docs.
Docker Stack files
Docker Stack is an extension of the already existing docker-compose file which lets you define deployment options for your swarm configuration like the number of replicas or resource limitations of your service.
If you have no experience with docker-compose yet I would recommend looking into this article first.
Creating a stack
As said before docker stack is an extension of the docker-compose file and just lets you define some extra attributes for your swarm deployment. These attributes can be defined using the deploy key in a compose file.
Important attributes include:
replicas- Defines the number of replicas for a serviceupdate_config- Defines how the service will be updated e.g. parallelism and delaylabelsrestart_policyresources
Here is an example of a stack deployment:
version: "3.7"
services:
  nginx:
    image: nginx:latest
    ports: ["8080:80"]
    deploy:
      replicas: 6
      update_config:
        parallelism: 2
        delay: 10s
      restart_policy:
        condition: on-failure
      resources:
        limits:
          cpus: "0.1"
          memory: 1G
More information about the available options for the deploy keyword can be found here.
Managing a stack
Stacks can be executed by running the docker stack deploy command and providing your stack file.
docker stack deploy -c docker-compose.yml nginxtestYou can also list all your stacks or the services of a specific stack using the ls and ps command.
# List all stacks
docker stack ls

# List the services of a specific stack
docker stack ps STACK_NAME
Removing a stack is similar to removing a service and can be done using the rm command.
docker stack rm STACK_NAMEExample
Now that we have gone through the theory of Swarm let’s see some of the magic we just talked about in action. For that, we are going to deploy a Nestjs GraphQL application which already includes a docker-compose file, so we can focus on the swarm configuration.
The project contains a local image that has to be stored in a registry before the file can be run as a swarm. If you don’t know what a registry is or why we need one I would recommend reading this article on the docker documentation.
Let’s start by cloning the repository with the finished boilerplate from Github.
git clone https://github.com/TannerGabriel/nestjs-graphql-boilerplate.gitThis should give you the following folder structure:
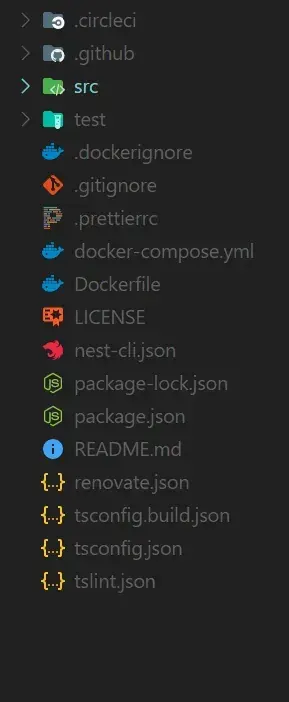
Nestjs GraphQL Boilerplate folder structure
As said above the project already contains a docker-compose.yml file that should look like this.
version: '3'

services:
  nodejs:
    build:
      context: ./
      dockerfile: Dockerfile
    restart: always
    environment:
      - DATABASE_HOST=mongo
      - PORT=3000
    ports:
      - '3000:3000'
    depends_on: [mongo]
  mongo:
    image: mongo
    ports:
      - '27017:27017'
    volumes:
      - mongo_data:/data/db

volumes:
  mongo_data: {}
Now we will need to make a few changes to the file, so we can upload the custom Node.js image to a registry (We will set up a local registry for testing purposes).
Pushing the image to the registry
First, we will need to add an image tag to the Node.js services and provide the registry where it should be saved (In our case localhost:5000).
services:
  nodejs:
    image: 127.0.0.1:5000/nodejs
Now we will create the local registry using the following command:
docker service create --name registry -p 5000:5000 registry:2After the registry is running we can continue with pushing the local image to the registry using the push command.
docker-compose pushAdding the swarm config
With the image in place, we can go ahead and add the swarm configuration to the docker-compose file.
version: '3'

services:
  nodejs:
    image: 127.0.0.1:5000/nodejs
    build:
      context: ./
      dockerfile: Dockerfile
    restart: always
    environment:
      - DATABASE_HOST=mongo
      - PORT=3000
    ports:
      - '3000:3000'
    depends_on: [mongo]
    deploy:
      replicas: 6
      update_config:
        parallelism: 2
        delay: 10s
      restart_policy:
        condition: on-failure
      resources:
        limits:
          cpus: "0.1"
          memory: 1G
  mongo:
    image: mongo
    ports:
      - '27017:27017'
    volumes:
      - mongo_data:/data/db

volumes:
  mongo_data: {}
All right, let’s understand what’s going on here by walking through the code:
- The
deploykeyword is used to provide the configuration that will be used by the swarm - After that, we add some of the options we talked about above. E.g. replicas, resources or restart_policy
Deploying the service
That is it! We have finished our Docker files and can now move on to running the application. This is done using the following command:
docker stack deploy --compose-file docker-compose.yml stackdemoAs indicated by the terminal output, your services are now running and you can check it by either writing docker stack ls in the command line or visiting localhost:3000/graphql. You should see something similar to this:

Source
Conclusion
You made it all the way until the end! I hope that this article helped you understand the Docker Swarm and how you can use it to improve your development and deployment workflow as a developer.
If you have found this useful, please consider recommending and sharing it with other fellow developers. If you have any questions or feedback, let me know in the comments down below.