In this guide, you will learn everything you need to know about Docker Compose and how you can use it to run multi-container applications.
With applications getting larger and larger as time goes by it gets harder to manage them in a simple and reliable way. That is where Docker Compose comes into play. Docker Compose allows us developers to write a YAML configuration file for our application service which then can be started using a single command.
This guide will show you all the important Docker Compose commands and the structure of the configuration file. It can also be used to look up the available commands and options later on.
Table of contents
Open Table of contents
Why care about Docker-compose
Before we get into the technical details let’s discuss why a programmer should even care about docker-compose in the first place. Here are some reasons why developers should consider implementing Docker in their work.
Portability
Docker Compose lets you bring up a complete development environment with only one command:docker-compose up, and tear it down just as easily using docker-compose down. This allows us developers to keep our development environment in one central place and helps us to easily deploy our applications.
Testing
Another great feature of Compose is its support for running unit and E2E tests in a quick a repeatable fashion by putting them in their own environments. That means that instead of testing the application on your local/host OS, you can run an environment that closely resembles the production circumstances.
Multiple isolated environments on a single host
Compose uses project names to isolate environments from each other which brings the following benefits:
- You can run multiple copies of the same environment on one machine
- It prevents different projects and service from interfering with each other
Common use cases
Now that you know why Compose is useful and where it can improve the workflow of us developers let’s take a look at some common use cases.
Single host deployments
Compose was traditionally focused on development and testing but can now be used to deploy and manage a whole deployment of containers on a single host system.
Development environments
Compose provides the ability to run your applications in an isolated environment that can run on any machine with Docker installed. This makes it very easy to test your application and provides a way to work as close to the production environment as possible.
The Compose file manages all the dependencies (databases, queues, caches, etc) of the application and can create every container using a single command.
Automated testing environments
An important part of Continues integration and the whole development process is the automated testing suite which requires an environment in which the tests can be executed. Compose provides a convenient way to create and destroy isolated testing environments that are close to your production environment.
Installation
Compose can be run on nearly any operating system and is very easy to install so let’s get into it.
Windows and Mac
Compose is included in the Windows and Mac Desktop installation and doesn’t have to be installed separately. The installation instructions can be found here:
Linux
On Linux you can install Compose by downloading its binary which can be done using the following instructions:
Download the latest stable version using this command:
sudo curl -L "https://github.com/docker/compose/releases/download/1.24.1/docker-compose-$(uname -s)-$(uname -m)" -o /usr/local/bin/docker-composeNow you just need to apply the executable permissions to it.
sudo chmod +x /usr/local/bin/docker-composeAfter that, you can check your installation with the following command:
docker-compose --versionStructure of the Compose file
Compose allows us developers to easily handle multiple docker containers at once by applying many rules which are declared in a docker-compose.yml file.
It consists of multiple layers that are split using tab stops or spaces instead of the braces we know in most programming languages. There are four main things almost every Compose-File should have which include:
- The version of the compose file
- The services which will be built
- All used volumes
- The networks which connect the different services
A sample file could look like this:
version: '3.3'

services:
   db:
     image: mysql:5.7
     volumes:
       - db_data:/var/lib/mysql
     restart: always
     environment:
       MYSQL_ROOT_PASSWORD: somewordpress
       MYSQL_DATABASE: wordpress
       MYSQL_USER: wordpress
       MYSQL_PASSWORD: wordpress

   wordpress:
     depends_on:
       - db
     image: wordpress:latest
     ports:
       - "8000:80"
     restart: always
     environment:
       WORDPRESS_DB_HOST: db:3306
       WORDPRESS_DB_USER: wordpress
       WORDPRESS_DB_PASSWORD: wordpress
       WORDPRESS_DB_NAME: wordpress
volumes:
    db_data: {}
As you can see this file contains a whole WordPress application including the MySQL database. Each of these services is treated as a separate container that can be swapped in and out when you need it.
Now that we know the basic structure of a Compose file let’s continue by looking at the important concepts.
Concepts / Keywords
The core aspects of the Compose file are its concepts which allow it to manage and create a network of containers. In this section, we will explore these concepts in detail and take a look at how we can use them to customize our Compose configuration.
Services
The services tag contains all the containers which are included in the Compose file and acts as their parent tag.
services:
  proxy:
    build: ./proxy
  app:
    build: ./app
  db:
    image: postgres
Here you can see that the services tag contains all the containers of the Compose configuration.
Base image (Build)
The base image of a container can be defined by either using a preexisting image that is available on DockerHub or by building images using a Dockerfile.
Here are some basic examples:
version: '3.3'

services:
    alpine:
        image: alpine:latest
        stdin_open: true
        tty: true
        command: sh
Here we use a predefined image from DockerHub using the image tag.
version: '3.3'
services:
    app:
        container_name: website
        restart: always
        build: .
        ports:
            - '3000:3000'
    command:
        - 'npm run start'
In this example, we define our images using the build tag which takes the destination of our Dockerfile as a parameter.
The last option of defining the base image is to use a Dockerfile with a custom name.
build:
    context: ./dir
    dockerfile: Dockerfile.dev
Ports
Exposing the ports in Compose works similarly as in the Dockerfile. We differentiate between two different methods of exposing the port:
Exposing the port to linked services:
expose:
 - "3000"
 - "8000"
Here we publish the ports to the linked services of the container and not to the host system.
Exposing the port to the host system:
ports:
  - "8000:80"  # host:container
In this example, we define which port we want to expose and the host port it should be exposed to.
You can also define the port protocol which can either be UDP or TCP:
ports:
  - "8000:80/udp"
Commands
Commands are used to execute actions once the container is started and act as a replacement for the CMD action in your Dockerfile.
The CMD action is the first command that gets executed when the container is started and is therefore mostly used to start a process e.g. start your website through a CLI command like npm run start.
app:
        container_name: website
        restart: always
        build: ./
        ports:
            - '3000:3000'
        command:
            - 'npm run start'
Here we create a service for a website and add the starting command using the command tag. This command will be executed after the container has started and will then start the website.
For more information about CMD, RUN, and Entrypoint you can read this article which discusses the details and compares their functionality.
Volumes
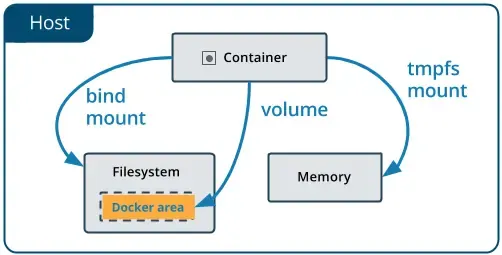
Volumes are Docker’s preferred way of persisting data which is generated and used by Docker containers. They are completely managed by Docker and can be used to share data between containers and the Host system.
They do not increase the size of the containers using it, and their context is independent of the lifecycle of the given container.
 Src: https://docs.docker.com/storage/volumes/
There are multiple types of volumes you can use in Docker. They can all be defined using the volumes keyword but have some minor differences which we will talk about now.
Normal Volume:
The normal way to use volumes is by just defining a specific path and let the Engine create a volume for it. This can be done like this:
volumes:
  # Just specify a path and let the Engine create a volume
  - /var/lib/mysql
Path mapping:
You can also define absolute path mapping of your volumes by defining the path on the host system and mapping it to a container destination using the: operator.
volumes:
  - /opt/data:/var/lib/mysql
Here you define the path of the host system followed by the path of the container.
Named volume:
Another type of volume is the named volume which is similar do the other volumes but has its own specific name that makes it easier to use on multiple containers. That’s why it’s often used to share data between multiple containers and services.
volumes:
  - datavolume:/var/lib/mysql
Dependencies:
Dependencies in Docker are used to make sure that a specific service is available before the dependent container starts. This is often used if you have a service that can’t be used without another one e.g. a CMS (Content Management System) without its database.
   ghost:
        container_name: ghost
        restart: always
        image: ghost
        ports:
            - 2368:2368
        environment:
            - .
        depends_on: [db]
    db:
        image: mysql
        command: --default-authentication-plugin=mysql_native_password
        restart: always
        environment:
            MYSQL_ROOT_PASSWORD: example
Here we have a simple example of a Ghost CMS which depends on the MySQL database to work and therefore uses the depends_on command. The depends_on command takes an array of string which defines the container names the service depends on.
Environment variables:
Environment variables are used to bring configuration data into your applications. This is often the case if you have some configurations that are dependent on the host operating system or some other variable things that can change.
There are many different options of passing environment variables in our Compose file which we will explore here:
Setting an environment variable:
You can set environment variables in a container using the environment keyword, just like with the normal docker container run --environment command in the shell.
web:
  environment:
    - NODE_ENV=production
In this example, we set an environment variable by providing a key and the value for that key.
Passing an environment variable:
You can pass environment variables from your shell straight to a container by just defining an environment key in your Compose file and not giving it a value.
web:
  environment:
    - NODE_ENV
Here the value of NODE_ENV is taken from the value from the same variable in the shell which runs the Compose file.
Using an .env file:
Sometimes a few environment variables aren’t enough and managing them in the Compose file can get pretty messy. That is what .env files are for. They contain all the environment variables for your container and can be added using one line in your Compose file.
web:
  env_file:
    - variables.env
Networking
Networks define the communication rules between containers, and between containers and the host system. They can be configured to provide complete isolation for containers, which enables building applications that work together securely.
By default, Compose sets up a single network for each container. Each container is automatically joining the default network which makes them reachable by both other containers on the network, and discoverable by the hostname defined in the Compose file.
Specify custom networks:
Instead of only using the default network you can also specify your own networks within the top-level networks key, allowing to create more complex topologies and specifying network drivers and options.
networks:
  frontend:
  backend:
    driver: custom-driver
    driver_opts:
      foo: "1"
Each container can specify what networks to connect to with the service level networks keyword, which takes a list of names referencing entries of the top-level networks keyword.
services:
  proxy:
    build: ./proxy
    networks:
      - frontend
  app:
    build: ./app
    networks:
      - frontend
      - backend
  db:
    image: postgres
    networks:
      - backend
You can also provide a custom name to your network (since version 3.5):
version: "3.5"
networks:
  webapp:
    name: website
    driver: website-driver
For a full list of the network configuration options, see the following references:
External (Pre-existing) networks:
You can use pre-existing networks with Docker Compose using the external option.
networks:
  default:
    external:
      name: pre-existing-network
In this example, Docker never creates the default network and just uses the pre-existing network defined in the external tag.
Configure the default networks:
Instead of defining your own networks you could change the settings of the default network by defining an entry with the name default under the networks keyword.
version: "3"
services:
  web:
    build: .
    ports:
      - "8000:8000"
  db:
    image: postgres

networks:
  default:
    driver: custom-driver
Linking containers:
You may also define extra aliases for your containers that services can use to communicate with each other. Services in the same network can already reach one another. Links then only define other names under which the container can be reached.
version: "3"
services:
    web:
        build: .
        links:
            - "db:database"
    db:
        image: mongo
In this example, the web container can reach the database using one of the two hostnames (db or database).
CLI
All the functionality of Docker-Compose is executed through its build in CLI, which has a very similar set of commands to what is offered by Docker.
build    Build or rebuild services
help     Get help on a command
kill     Kill containers
logs     View output from containers
port     Print the public port for a port binding
ps       List containers
pull     Pulls service images
rm       Remove stopped containers
run      Run a one-off command
scale    Set number of containers for a service
start    Start services
stop     Stop services
restart  Restart services
up       Create and start containers
down     Stops and removes containers
They are not only similar but also behave like their Docker counterparts. The only difference is that they affect the entire multi-container architecture which is defined in the docker-compose.yml file instead of a single container.
Some Docker commands are not available anymore and have been replaced with other commands that make more sense in the context of a completely multi-container setup.
The most important new commands include the following:
docker-compose updocker-compose down
Using Multiple Docker Compose Files
The use of multiple Docker Compose files allows you to change your application for different environments (e.g. staging, dev, and production) and helps you run admin tasks or tests against your application.
Docker Compose reads two files by default, a docker-compose.yml file, and an optional docker-compose.override.yml file. The docker-compose.override file can be used to store overrides of the existing services or define new services.
To use multiple override files, or an override file with a different name, you can pass the -f option to the docker-compose up command. The base Compose file has to be passed on the first position of the command.
docker-compose up -f override.yml override2.ymlWhen you use multiple configuration files, you need to make sure that the paths are relative to the base Compose file which is specified first with the -f flag.
Now let’s look at an example of what can be done using this technique.
# original service
command: npm run dev

# new service
command: npm run start
Here you override the old run command with the new one which starts your website in production instead of dev mode.
When you use multiple values on options like ports, expose, DNS and tmpfs, Docker Compose concatenates the values instead of overriding them which is shown in the following example.
# original service
expose:
    - 3000

# new service
expose:
    - 8080
Compose in production
Docker Compose allows for easy deployment because you can deploy your whole configuration on a single server. If you want to scale your app, you can run it on a Swarm cluster.
There are still things you probably need to change before deploying your app configuration to production. These changes include:
- Binding different ports to the host
- Specifying a restart policy like
restart: alwaysto avoid downtime of your container - Adding extra services such as a logger
- Removing any unneeded volume bindings for application code
After you have taken these steps you can deploy your changes using the following commands:
docker-compose build
docker-compose up --no-deps -d
This first rebuilds the images of the services defined in the compose file and then recreates the services.
Example
Now that we have gone through the theory of Compose let’s see some of the magic we just talked about in action. For that, we are going to build a simple Node.js application with a Vue.js frontend which we will deploy using the tools we learned about earlier.
Let’s get started by cloning the repository with the finished Todo list application, so we can directly jump into the Docker part.
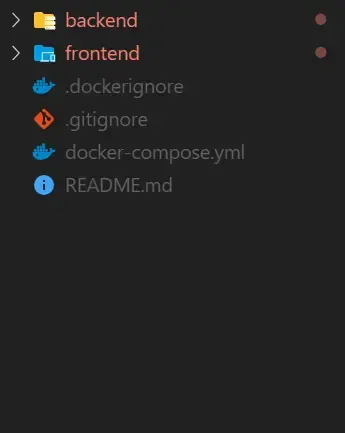
git clone --single-branch --branch withoutDocker https://github.com/TannerGabriel/docker-node-mongodb.gitThis should give you a project with the following folder structure:

Now that we have the project setup lets continue by writing our first Dockerfile for the Node.js backend.
FROM node:latest

# Create app directory
WORKDIR /usr/src/app

# Install app dependencies
COPY package*.json ./

RUN npm install

# Bundle app source
COPY . .

EXPOSE 3000:3000
CMD [ "node", "server.js" ]
All right, let’s understand what’s going on here by walking through the code:
- First, we define the base image using the FROM keyword
- Then we set the directory we are going to work in and copy our local package.json file into the container
- After that, we install the needed dependencies from the package.json file and expose the port 3000 to the host machine
- The CMD keyword lets you define the command which will be executed after the container startup. In this case, we use it to start our express server using the
node server.jscommand.
Now that we have finished the Dockerfile of the backend lets complete the same process for the frontend.
FROM node:lts-alpine

RUN npm install -g http-server

WORKDIR /app

COPY package*.json ./
COPY .env ./

RUN npm install

COPY . .

RUN npm run build

EXPOSE 8080
CMD [ "http-server", "dist" ]
This file is similar to the last one but installs an HTTP server which displays the static site we get when building a Vue.js application. I will not go into further detail about this script because it isn’t in the scope of this tutorial.
With the Dockerfiles in place, we can go ahead and write the docker-compose.yml file we learned so much about.
First, we define the version of our Compose file (in this case version 3)
version: '3'After that, we start defining the services we need for the project to work.
services:
    nodejs:
        build:
            context: ./backend/
            dockerfile: Dockerfile
        container_name: nodejs
        restart: always
        environment:
            - HOST=mongo
        ports:
            - '3000:3000'
        depends_on: [mongo]
The Node.js service uses the Dockerfile of the backend which we created above and publishes the port 3000 to the host machine. The service also depends on the mongo service which means that it lets the database start first before starting itself.
Next, we define a basic MongoDB service which uses the default image provided on DockerHub.
     mongo:
        container_name: mongo
        image: mongo
        ports:
            - '27017:27017'
        volumes:
            - ./data:/data/db
This service also publishes a port to the host system and saves the data of the database in a local folder using a volume.
The last service we need to define is the frontend which uses the frontend Dockerfile to build the image and publishes port 8080 to the host system.
    frontend:
        build:
            context: ./frontend/
            dockerfile: Dockerfile
        container_name: frontend
        restart: always
        ports:
            - '8080:8080'
That is it! We have finished our Docker files and can now move on to running the application. This is done using the following two commands:
# builds the images from the dockerfiles
docker-compose build

# starts the services defined in the docker-compose.yml file
# -d stands for detached
docker-compose up -d
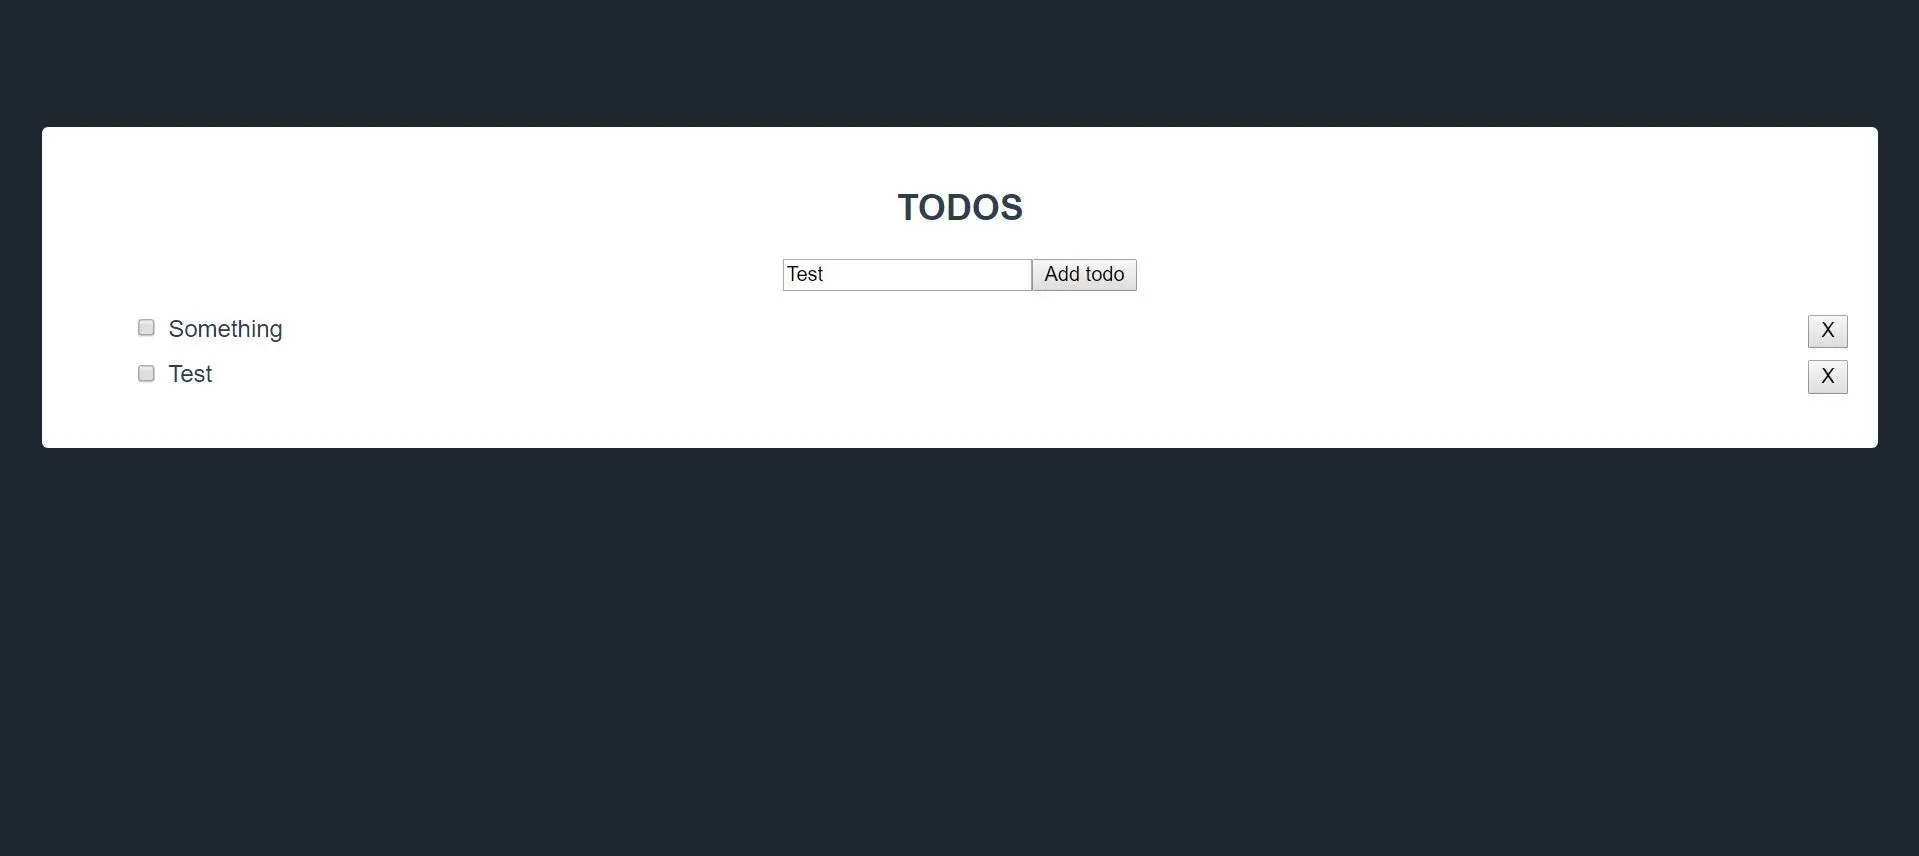
As indicated by the terminal output, your services are now running and you are ready to visit the finished website on localhost:8080 which should look something like this:

Now you can add todos to your list using the add button and your app should look like this.

If you reload the page the items should stay the same because they are saved in our database. The last thing I want to show is how you can get the debug logs of the running containers.
docker-compose logsThis command will display all logs of the running containers and can help you debug your errors or check the current state of your application.
That is it for the project. The source code for the whole project can be found on my Github.
Conclusion
You made it all the way until the end! I hope that this article helped you understand the Docker Compose and how you can use it to improve your development and deployment workflow as a developer.
If you have found this useful, please consider recommending and sharing it with other fellow developers. If you have any questions or feedback, let me know in the comments down below.