In this guide, you will learn what Docker is and how you can use it to containerize and deploy your applications.
With application getting larger and larger as time goes by, it gets harder to find a reliable and straightforward solution for deploying them on multiple different machines. That is where Docker comes into play. Docker allows us developers to deploy our applications in a container environment that can be run on any device that has Docker installed.
This guide will show you all the essential Docker commands and the structure of the configuration file. It can also be used to look up the available commands and options later on.
Table of contents
Open Table of contents
What is Docker?
Docker is an open-source platform for deploying and managing containerized applications. It allows developers to easily package their applications into containers that can be deployed on every machine with a valid Docker installation.
It is essentially a toolkit to help developers build, manage, and deploy containers using single commands and configuration files.
Why should you use it?
Now that you have a basic idea of what Docker is, you might be thinking, why should I use it in the first place. That is a valid question, and here is a list of reasons why Docker is helpful and where it can improve your development and deployment workflow.
- Write application once and deploy it everywhere - Containerized Docker applications can be deployed on every machine with a valid Docker installation no matter the operating system
- Docker allows for a rapid and seeming less development and deployment process
- Great CI and CD integration
- Docker ensures your applications and services are isolated from each other and work all the time
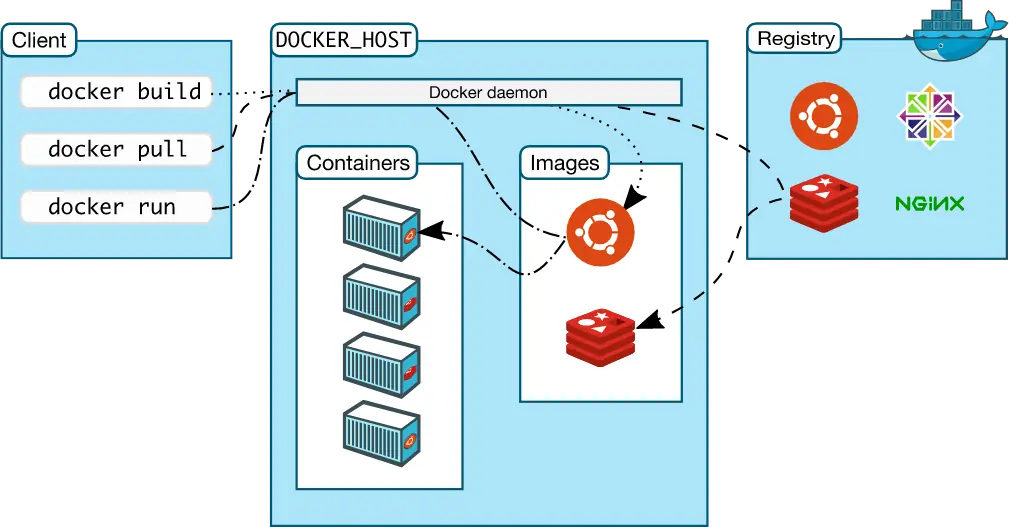
Docker Architecture
Dockers architecture is based on a client-server principle. The Docker client talks to the Docker Daemon, which is responsible for building, running, and managing the containers.
Concepts
Now that you know why Docker is useful and where it can improve your workflow as a developer, let’s continue by looking at the most critical concepts.
Images
Images are read-only templates containing instructions for creating Docker containers. Images are often based on another image, the so-called base image, and add some additional customizations. For example, you build an image based on the node image and add additional installation of your npm packages to run your application.
Images can either be stored locally or in some kind of image registry like DockerHub.
Image Registry
An image registry is a stateless, highly scalable central space for storing and distributing container images. They provide secure image management and a fast way to pull and push images with the right permissions.
You can either use a public image registry like DockerHub or create your own private image registry using the following guide.
Containers
A container is a runnable instance of a Docker image that can be managed using either the Docker CLI or API. You can connect your Containers to Networks, attach Storage, and even build images from their current state.
Containers are stateless by default, which means that the current state will be lost when the container is removed or restarted.
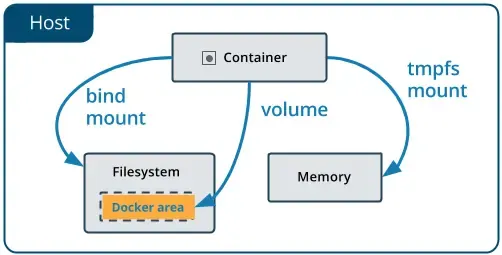
Volumes
Volumes are Docker’s preferred way of persisting data, which is generated and used by Docker containers. They are completely managed by Docker and can be used to share data between containers and the Host system.
They do not increase the size of the containers using it, and their context is independent of the lifecycle of the given container.
Environment variables
Environment variables are used to bring configuration data into your container. This is often the case when you have some specific configurations for your host operating system or deployment.
Networks
Networks are used to connect multiple Docker workloads with each other so they can communicate and share data. They can also be used to completely isolate single applications for maximum security.
Installing Docker
Before we can start using the different Docker concepts in Action, you first need to install Docker on your host machine.
Windows and Mac
On windows and mac, you can install Docker Engine, which will give you all the tools you need to use Docker out of the box.
Linux
On Linux, I would recommend following the official installation guide provided by Docker.
Basics
This section will cover all the essential commands to creating, manage and interact with Docker containers.
Running a container
Containers are created using the docker run command, which takes the image name and version as a parameter.
docker run nginxYou can also pass additional arguments using certain flags. Here is a list of the most essential:
-p,--publish: Publish container ports to the host system-v,--volume: Mount a volume to your container-e,--env: Add an environment variable to your container-i,--interactive: Attach to stdin-t,--tty: Pseudo tty--name: Name your container
Let’s look at an example to paint a clearer picture.
docker run --name nginxcontainer -p 8080:80 nginxThe name flag is used to give the container a custom name, which helps when searching and filtering through multiple containers, and the -p flag exposes the port 80 of the container to port 8080 of the host machine.
Listing all containers
Listing all containers can be done using the docker ps command, which returns all currently running containers.
docker ps

# Output
CONTAINER ID        IMAGE                    COMMAND                  CREATED             STATUS              PORTS                  NAMES
261e991884cb        nginx                    "nginx -g 'daemon of…"   7 minutes ago       Up 7 minutes        0.0.0.0:8080->80/tcp   nginxcontainer
If you want to list all containers instead, you can add the -a tag to the command.
docker ps -aStopping containers
Stopping containers is also very simple and can be done using the docker stop command.
docker stop $CONTAINER_IDThe container id can be acquired by using the docker ps command. You can also stop all running containers using the following expression.
docker stop $(docker ps -q)Removing containers
Removing containers is very similar to stopping them and can be done using the docker rm command.
docker rm $CONTAINER_IDYou can also remove all available containers using the following expression.
docker rm $(docker ps -q -a)Executing commands in a container
Executing commands in already running containers is vital when using Docker and can be achieved using the docker exec command.
docker exec [options] CONTAINER COMMAND
  -d, --detach        # run in background
  -i, --interactive   # stdin
  -t, --tty           # interactive
For example, you can open a bash terminal in an already running container using the following command.
docker exec -it $CONTAINER_ID /bin/bashGet container logs
Getting the logs of your container can be very important when debugging applications and searching for errors.
docker logs $CONTAINER_ID

# Example output for nginx image:
172.17.0.1 - - [06/Apr/2020:15:35:58 +0000] "GET / HTTP/1.1" 200 612 "-" "Mozilla/5.0 (Windows NT 10.0; Win64; x64) AppleWebKit/537.36 (KHTML, like Gecko) Chrome/80.0.3987.163 Safari/537.36" "-"
You can also watch the logs live using the -f flag.
docker logs -f $CONTAINER_IDGet the resource usage of your containers
Sometimes it might be useful to check the resource usage of your containers to validate that your host machine is up to the job and that everything is workings as expected.
docker stats

# Output:
CONTAINER ID        NAME                CPU %               MEM USAGE / LIMIT     MEM %               NET I/O             BLOCK I/O           PIDS
05ad90b5743b        nginxcontainer      0.00%               2.168MiB / 1.943GiB   0.11%               5.15kB / 2.16kB     0B / 0B             2
Get container information
Getting detailed information about your container can be done using the docker inspect command.
docker inspect $CONTAINER_IDList all images
Listing all image is done using the docker images command.
docker images [OPTIONS] [REPOSITORY[:TAG]]

Options:
  -a, --all             Show all images (default hides intermediate images)
      --digests         Show digests
  -f, --filter filter   Filter output based on conditions provided
      --format string   Pretty-print images using a Go template
      --no-trunc        Don't truncate output
  -q, --quiet           Only show numeric IDs
Pull an image
Pulling images without first running them in containers can be done using the docker pull command.
docker pull ubuntuRemove an image
Removing an image is similar to removing a container. You just need to use the docker rmi command instead of docker rm.
docker rmi $IMAGE_NAMEClean up all unused images and containers
Removing all unused images and containers can get a tough task after using Docker for a long time. The docker prune command makes this easier by automatically removing all dangling images, containers, and networks.
docker system pruneIf you want, you can also delete all unused images and containers using the -a tag.
docker system prune -aDockerfile structure
Dockerfiles are the building block of Docker images and define a list of commands the Docker engine runs to assemble and run it.
This section will walk you through the process of creating your own image using a Dockerfile and what you should keep in mind when doing so.
Important instructions
As already stated above, a Dockerfile is basically a list of commands the Docker engine runs to assemble and run your image. Let’s take a look at the most important instructions.
FROM- Defines the base image used to start the build process of your imageRUN- Used to execute a command during the build process of your imageCopy- Copies new file or directories to a containerExpose- Informs Docker the container listens to a specific port at runtime (Does not actually make the port available)CMD- Define a default command that will be executed when building a new container from the imageEntrypoint- Defines the default command that will be executed when the container is runningVolume- Enable access between the container and the host machineWorkdir- Sets the current working directoryEnv- Sets an environment variableLabel- Allows you to add labels to your Docker imagesMaintainer- Defines the maintainer of the Docker imageUser- Sets the username for RUN, CMD or ENTRYPOINT commands
Constructing a Dockerfile
Now it is time to but the instructions from above to use by building your own Docker image (We will deploy build a simple Node.js Dockerfile for deploying applications).
Create a new directory and the Dockerfile that will contain our configuration.
# Create the directory
mkdir docker-example
cd docker-example
# Create the Dockerfile
touch Dockerfile
On top of the file, we will add our FROM instruction with the base image we want to have (If you are not sure if there is an image for your use case, I would recommend visiting DockerHub and searching for it there).
FROM node:ltsNext, we set our working directory using the WORKDIR instruction.
WORKDIR /usr/src/appThen we copy our package.json file into the container, so we can install our required dependencies.
COPY package*.json ./Now we can install the dependencies using the RUN command.
RUN npm installThen we copy all our other files and tell Docker that our container will listen to port 4000 at runtime.
# Copy the other files to the directory
COPY . .
# Tell Docker that the container will listen to port 4000 at runtime
EXPOSE 4000:4000
Finally, the CMD command will be used to start the Node.js application when the container is run.
FROM node:lts

WORKDIR /usr/src/app

COPY package*.json ./

RUN npm install

COPY . .

EXPOSE 4000:4000

CMD [ "node", "server.js" ]
Building your Dockerfile
Now it is time to build the Dockerfile and run our image in a container.
docker build -t nodejsapp .The build command takes the path of the image as its argument, but we also provide a custom name using the -t flag.
docker run -p 4000:4000 nodejsappNow we can run the image like any other using the run command and provide the port that should be available to the host machine.
Tagging images
Tagging your local images is essential when preparing to push them to an image registry.
docker tag SOURCE_IMAGE[:TAG] TARGET_IMAGE[:TAG]Pushing image to a registry
Now you can push your image to the registry using the docker push command.
docker push [OPTIONS] NAME[:TAG]Multistage builds
Multistage builds let you build your Docker image in multiple stages, which can reduce the size of your images immensely if used right. The files can be copied from one stage to another.
Basic example:
Here is a simple example where we first build a golang application and then deploy it on alpine Linux.
FROM golang:1.6-alpine

RUN mkdir /app
ADD . /app/
WORKDIR /app
RUN CGO_ENABLED=0 GOOS=linux go build -a -installsuffix cgo -o main .

FROM alpine
EXPOSE 80
CMD ["/app"]

# Copy from first stage
COPY --from=0 /app/main /app
The files of the first stage are copied to the second stage and then used to run the application.
Name your build stages:
Naming your build stages can come in handy for organization and documentation purposes. Just add the AS keyword followed by the name after your from instruction, as shown in the following example.
FROM node:12 AS build

RUN apk add --update --no-cache \
    python \
    make \
    g++

COPY . /src
WORKDIR /src

RUN npm ci

RUN npm run format
RUN npm run build
RUN npm run test

RUN npm prune --production

FROM node:12-alpine

EXPOSE 3000
WORKDIR /usr/src/service

COPY --from=build /src/node_modules node_modules
COPY --from=build /src/dist dist

USER node

CMD ["node", "./dist/server/index.js"]
Dockerignore
The .dockerignore file contains the names of the files and directories that want to be copied into the container by an ADD or COPY instruction. It is identical to the .gitignore file but only in the Docker context.
/dist
/node_modules
Adding volumes
Volumes are the preferred way for persisting data in Docker and can be added to your container using a basic flag.
Normal volume
A volume can be added using the -v or --mount flag.
docker run --name nginxcontainer -v etc/nginx/ -d nginxPath mapping
You can also map the path of your host system to a container destination using the : operator.
docker run --name nginxcontainer -v /host/path/nginx.conf:/etc/nginx/nginx.conf:ro -d nginxHere you define the path of the host system followed by the path of the container.
Named volume
You can also define named volumes for easier management and usability by omitting the / before the colon.
docker run --name nginxcontainer -v conf:etc/nginx/ -d nginxHere you define the volume name conf followed by the container destination etc/nginx/.
More Resources
If you want to learn more about Docker and how you can create more complex deployments, then the following guides might prove useful.
- The definitive Guide to Docker Compose
- The definitive Guide to Docker Swarm
- How to create your own private Docker registry and secure it
Sources
The sources for this article.
- Official Docker Documentation
- A Beginners Guide to the Dockerfile
- Runnable Docker Section
- Docker Basics: Dockerfile
Conclusion
You made it all the way until the end! I hope that this article helped you understand Docker and how you can use it in your development and deployment workflow.
If you have found this useful, please consider recommending and sharing it with other fellow developers and subscribing to my newsletter. If you have any questions or feedback, let me know using my contact form or contact me on Twitter.