Modern applications are increasingly built using container and microservice architecture. Kubernetes is open-source software for deploying and managing those containers at scale. It groups containers into logical units for easier management, discovery, and scaling of your application.
The primary motivation behind this article is to give a clear overview of the entire world of Kubernetes and making it simple and easy to understand. This guide will go over all essential concepts of Kubernetes and will then use them all in a practical example.
Even if you had no prior experience with Kubernetes before, this article will prove to be the perfect start for your journey.
So, without wasting any further time, let’s get started.
Why care about Kubernetes?
Before we dive into the technical concepts, let’s first discuss why a developer should even use Kubernetes in the first place. Here are some reasons why developers should consider implementing Kubernetes in their work.
Portability
Moving containerized applications from development to production is a seeming less process when using Kubernetes. Kubernetes enables developers to orchestrate containers consistently in different environments across on-premises infrastructure and public and hybrid clouds.
Scalability
Defining complex containerized applications and deploying them globally across multiple clusters of servers is made simple as Kubernetes optimizes resources according to your desired state. When Kubernetes scales applications horizontally, it will also automatically monitor and maintain container health.
Extensibility
Kubernetes has a vast and ever-growing collection of extensions and plugins created by developers and companies that make it easy to add unique capabilities such as security, monitoring, or management capabilities to your cluster.
Kubernetes Concepts
Making use of Kubernetes requires an understanding of the different abstractions it uses to represent the state of the system. That is what this section is all about. Getting familiar with the most essential concepts and giving you a clearer picture of the general architecture.
Pods
A Pod is a group of multiple containers of your application that share storage, a unique cluster IP address, and information about how to run them (e.g. container image, ports, restart and failure policies).
They are the building block of the Kubernetes platform. When we create a deployment or a service, Kubernetes will automatically create a Pod with the container inside.
Each pod runs on the node it is scheduled on and remains there until termination or deletion. In case the node fails or terminates, Kubernetes will automatically schedule identical Pods on the other available Nodes of the cluster.

Node
A node is a worker machine in a Kubernetes cluster and may be either a virtual or a physical machine, depending on the type of cluster. Each node is managed by the so-called master. The master automatically schedules pods across all nodes in the cluster, depending on their available resources and current configuration.
Each node has to run at least two services:
- Kubelet - A process responsible for the communication between the Kubernetes master and the node
- A container runtime - Responsible for pulling and running a container image (Docker for example)
Services
A Service is an abstraction that defines a logical set of Pods and a policy by which to access them. Services enable loose coupling between dependent Pods.
Although each pod has a unique IP-Address, those addresses are still not exposed to the outside of the cluster. A service therefore allows your deployment to receive traffic from outside sources.
Services can be exposed in multiple ways:
- ClusterIP (standard) - Only expose the port to the internals of the cluster
- NodePort - Expose the service on the same port on every node in the cluster using NAT
- Loadbalancer - Create an external load balancer to export the service on a specific IP Address
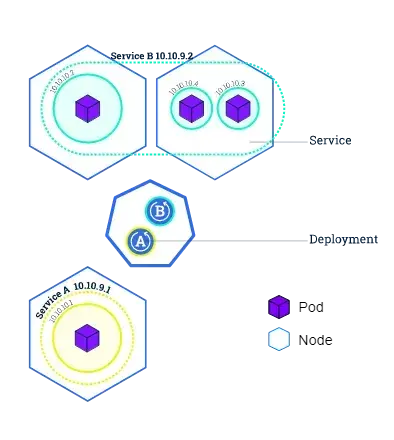
Deployments
Deployments contain a description of the desired state of your application. The deployment controller will then try to make sure that the current state of the application meets that description.
A deployment runs multiple replicas of your application and automatically replaces any instances that fail or become unresponsive. In this way, deployments help ensure that your application is available to serve user requests.
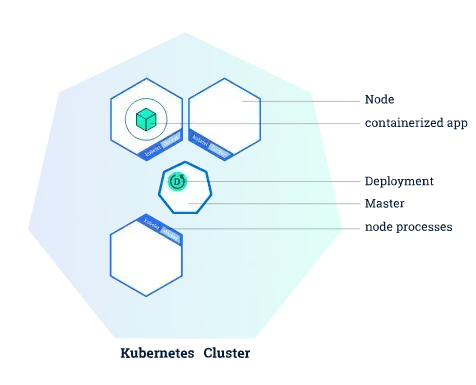
Src: Kubernetes app deployment
Installation
Before we can start creating our cluster, we first need to install Kubernetes on our local machine.
Docker Desktop:
If you are using Docker desktop on windows or mac, you can install Kubernetes directly in the settings window of the user interface.
Other installation:
If you are not using Docker desktop, I would recommend following the official installation guide for installing Kubectl and Minikube.
Kubernetes Basics
Now that we have the most essential concepts out of the way let’s continue by looking at the practical side of Kubernetes. This chapter will guide you through all the basics you need to know to deploy applications in a cluster.
Creating a cluster
Minikube automatically creates a cluster when you start it.
minikube startDocker desktop should also automatically create a cluster after the installation. You can check if your cluster is running using the following commands:
# Get information about the cluster
kubectl cluster-info

# Get all nodes of the cluster
kubectl get nodes
Deploying an application
Now that we have finished the installation and set up our first cluster, it is time to deploy an application to Kubernetes.
kubectl create deployment nginx --image=nginx:latestWe use the create deployment command and pass the name of the deployment and the container image as arguments. This example creates an Nginx deployment with one container and one replica.
You can see your running deployments using the get deployments command.
kubectl get deploymentsGet information about your deployments
Here are a few commands you can use to get more information about your deployments and pods in Kubernetes.
Getting all pods:
You can get a list of all running pods using the kubectl get pods command:
kubectl get podsThe output should look similar to this.

Currently running pods
Get a detailed description of your pods:
If you want a more detailed description of your pods, you can use the describe pods command instead.
kubectl describe podsOutput:
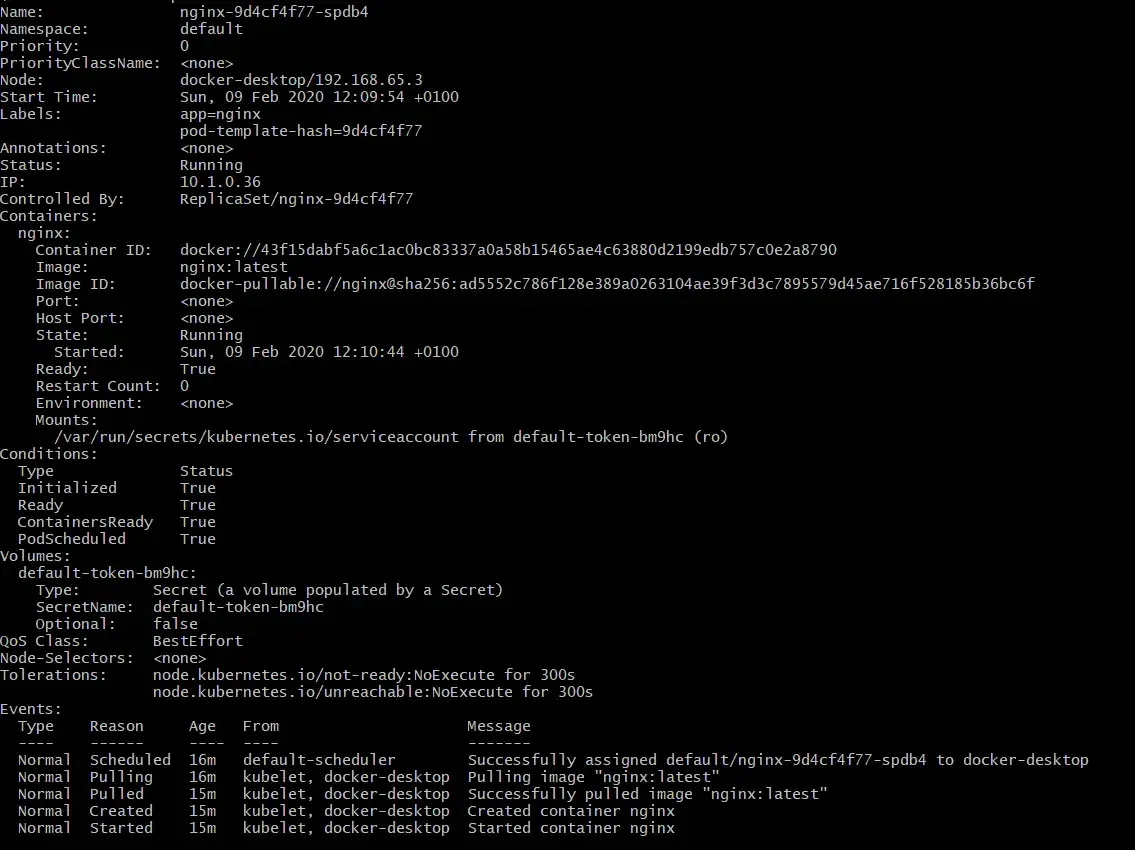
Describe pod output
View the logs of a pod:
The information your application would typically send out to STDOUT become logs of your container. You can access those logs using the following command.
kubectl logs $POD_NAMENote: You can get the name of your pod using either the get pods or describe pods command.
Executing a command in the container:
We can execute commands directly in our container using the kubectl exec command, which takes the pod name and the command we want to run as arguments.
kubectl exec $POD_NAME commandTo clarify, let’s look at an example where we start a bash terminal in the container.
kubectl exec -it $POD_NAME bashExposing your app publicly
As we already discussed earlier, a service defines a policy by which the deployment can be accessed with. In this section, we are going to take a look at how this is done and some different options you have when exposing your services to the public.
Creating a service:
We can create a service using the create service command that will take the port we want to expose and the type of port as arguments.
kubectl create service nodeport nginx --tcp=80:80This will create a service for our Nginx deployment and expose the port 80 of our container to a port on our host machine.
You can get the port on the host machine using the kubectl get services command:

Services and ports
As you can see, port 80 of the container is forwarded to port 31041 of my host machine. When you have the port, you can verify your deployment by visiting your localhost on that port.
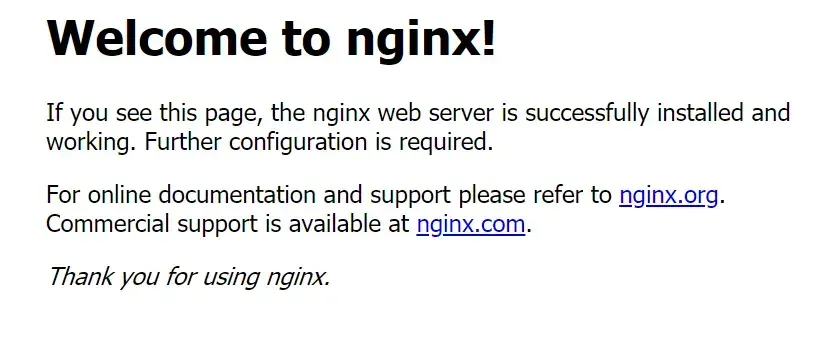
Result of the deployment
Deleting a service:
We can also remove existing services using the delete service command.
kubectl delete service nginxScale up your app
Scaling your application up and down is extremely simple using Kubernetes. You can change the number of replicas using a single command and Kubernetes will automatically create and maintain everything for you.
kubectl scale deployments/nginx --replicas=5This command will scale our Nginx service up to five replicas.
This way of deploying applications works excellent for small one container application but doesn’t provide the overview and re-usability needed for more prominent applications. This is where YAML files come into play.
YAML files let you declare your deployment, services and pods using a markup language, so they are reusable and better for scaling. Yaml files will be covered in-depth in the following chapters.
Declaring Kubernetes object in YAML
Every object in Kubernetes can be represented as a declarative YAML object that provides details about what and how you want to run. These files are often used to increase the re-usability of resource configuration like deployments, service, volumes and many more.
This section will show you the basics of YAML and how you can get a list of all available parameters and attributes of a Kubernetes object. We will also take a look at a deployment and service file to get a better feeling of the syntax and how you can deploy the file.
Getting the parameters of the different objects
There are many different Kubernetes objects and it is hard to remember every setting. That is where the explain command comes into play.
kubectl explain deployment

# Output
KIND:     Deployment
VERSION:  extensions/v1beta1

DESCRIPTION:
     DEPRECATED - This group version of Deployment is deprecated by
     apps/v1beta2/Deployment. See the release notes for more information.
     Deployment enables declarative updates for Pods and ReplicaSets.

FIELDS:
   apiVersion   <string>
     APIVersion defines the versioned schema of this representation of an
     object. Servers should convert recognized schemas to the latest internal
     value, and may reject unrecognized values. More info:
     https://git.k8s.io/community/contributors/devel/api-conventions.md#resources

   kind <string>
     Kind is a string value representing the REST resource this object
     represents. Servers may infer this from the endpoint the client submits
     requests to. Cannot be updated. In CamelCase. More info:
     https://git.k8s.io/community/contributors/devel/api-conventions.md#types-kinds

   metadata     <Object>
     Standard object metadata.

   spec <Object>
     Specification of the desired behavior of the Deployment.

   status       <Object>
     Most recently observed status of the Deployment.
You can also get the documentation of a specific field using the following syntax:
kubectl explain deployment.spec.replicasDeployment file
More complex deployments will normally be written in YAML for easy re-usability and changeability.
Here is the basic file structure:
apiVersion: apps/v1
kind: Deployment
metadata:
  # The name and label of your deployment
  name: mongodb-deployment
  labels:
    app: mongo
spec:
  # How many copies of each pod do you want
  replicas: 3
  # Which pods are managed by this deployment
  selector:
    matchLabels:
      app: mongo
  # Regular pod configuration / Defines containers, volumes and environment variable
  template:
    metadata:
      # label the pod
      labels:
        app: mongo
    spec:
      containers:
      - name: mongo
        image: mongo:4.2
        ports:
        - containerPort: 27017
The YAML file has multiple important sections:
apiVersion- Defines the version of the APIkind- The kind of Kubernetes object defined in the file (e.g. deployment, service, persistentVolume, …)metadata- Description of your YAML component containing name, labels and other informationspec- Defines the attribute of your deployment e.g. replicas, resource limitstemplate- Pod configuration of the deployment file
Now that you know the basic structure, you can deploy the file using the apply command.
kubectl apply -f deploy.yamlService file
Service files have a similar structure then deployments with minor differences in the parameters.
apiVersion: v1
kind: Service
metadata:
  name: mongo
spec:
  selector:
    app: mongo
  ports:
    - port: 27017
      targetPort: 27017
  type: LoadBalancer
Storage
When a pod is deleted or a container restarts, the whole data of the file system is deleted. In most cases, this is a good thing, because your stateless application doesn’t get littered with unneeded data. In other cases, persisting the data of your file system is vital for your application.
There are a few different kinds of storage:
- Container filesystem - Standard storage that stores the data of a single container for his lifetime
- Volume - Volumes let you save data and share it between different containers as long as the pod exists
- Persistent Volumes - Persistent Volumes save data even after the pod is deleted or restarted. They are the long-term storage in your Kubernetes cluster.
Volumes
Volumes let you save, share, and preserve data between multiple containers as long as the pod exists. This can be useful if you have pods with multiple containers that need to share data with each other.
There are two steps for using a volume in Kubernetes:
- The pod defines the volume
- The container uses the volumeMounts to add the volume to a specific path of the filesystem
You can add a volume to your pod using the following syntax:
apiVersion: v1
kind: Pod
metadata:
  name: nginx
spec:
  containers:
  - name: nginx
    image: nginx
    volumeMounts:
    - name: nginx-storage
      mountPath: /etc/nginx
  volumes:
  - name: nginx-storage
    emptyDir: {}
The volumes tag is used to define the volume that can then be mounted to a specific directory of the container filesystem (in this case /etc/nginx).
Persistent Volumes
Persistent volumes are almost identical to normal volumes, with the key difference that they preserve the data even after the pod is deleted. That is why they are used for long-term data storage purposes like a database, for example.
The most common way to define a persistent volume is a so-called Persistent Volume Claim (PVC) object, which connects to backend storage volumes through a series of abstractions.
Here is an example YAML configuration file.
apiVersion: v1
kind: PersistentVolumeClaim
metadata:
  name: pv-claim
  labels:
    app: sampleAppName
spec:
  accessModes:
    - ReadWriteOnce
  resources:
    requests:
      storage: 20Gi
You can then use your PVC in your actual Kubernetes deployment.
apiVersion: apps/v1
kind: Deployment
metadata:
  name: mysql
  labels:
    app: mysql
spec:
  selector:
    matchLabels:
      app: mysql
      tier: mysql
  strategy:
    type: Recreate
  template:
    metadata:
      labels:
        app: mysql
        tier: mysql
    spec:
      containers:
      - image: mysql:5.6
        name: mysql
        env:
        - name: MYSQL_ROOT_PASSWORD
          valueFrom:
            secretKeyRef:
              name: mysql-password
              key: password
        ports:
        - containerPort: 3306
          name: mysql
        volumeMounts:
        - name: mysql-persistent-storage
          mountPath: /var/lib/mysql
      volumes:
      - name: mysql-persistent-storage
        persistentVolumeClaim:
          claimName: mysql-pv-claim
There are more ways to save your data in Kubernetes and automate that process as much as possible. Here is a list of a few interesting topics you should take a look at.
Managing compute resources
Managing compute resources of your containers and applications is an important topic when it comes to container orchestration.
When your containers have a specified amount of resources available, the scheduler can make better decisions about which node to place the pod on. You will also run into fewer contention problems with the resources of different deployments.
There are two different types of resource specifications that we will cover in detail in the next two sections.
Requests
Requests tell Kubernetes the requirements of the pod and that it should only place the pod on nodes that have these requirements. Requests are defined under the resources tag on your container.
apiVersion: apps/v1
kind: Deployment
metadata:
  name: mongodb-deployment
  labels:
    app: mongo
spec:
  replicas: 3
  selector:
    matchLabels:
      app: mongo
  template:
    metadata:
      labels:
        app: mongo
    spec:
      containers:
      - name: mongo
        image: mongo:4.2
        ports:
        - containerPort: 27017
        resources:
          requests:
            memory: "64Mi"
            cpu: "250m"
Limits
Resource limits are used to constrain the memory and CPU usage of a specific pod and provide the maximum value of resources that the pod can never exceed.
apiVersion: apps/v1
kind: Deployment
metadata:
  name: mongodb-deployment
  labels:
    app: mongo
spec:
  replicas: 3
  selector:
    matchLabels:
      app: mongo
  template:
    metadata:
      labels:
        app: mongo
    spec:
      containers:
      - name: mongo
        image: mongo:4.2
        ports:
        - containerPort: 27017
        resources:
          limits:
            memory: "128Mi"
            cpu: "500m"
For more information on managing compute resources visit the official documentation.
Secrets
Kubernetes secrets allow you to safely store and manage sensitive data like passwords, API tokens or SSH keys.
To use a secret in your pod, you first need to reference it. This can happen in multiple ways:
- As a file in a volume that is mounted to a container
- Using an environment variable
- By kubelet when pulling an image from a private registry
Creating a secret
Creating secrets can either be done using the kubelet command tool or by defining a secret Kubernetes object using YAML.
Using kubelet:
Kubelet lets you create secrets using a simple create command where you only have to specify the data and the name of the secret. The data can either be passed in using a file or a literal.
kubectl create secret generic admin-credentials --from-literal=user=poweruser --from-literal=password='test123'The same functionality using a file would look something like this.
echo -n 'poweruser' > ./username.txt
echo -n 'test123' > ./password.txt
kubectl create secret generic admin-credentials--from-file=./username.txt --from-file=./password.txt
You can also provide multiple files at once by using a folder.
kubectl create secret generic admin-credentials --from-file=/credsUsing definition files:
Like other Kubernetes objects, secrets can also be defined using a YAML file.
apiVersion: v1
kind: Secret
metadata:
  name: secret-apikey
data:
  apikey: YWRtaW4=
The secret contains a key-value pair of your sensitive information with apiKey being the key and YWRtaW4= being the base decoded value.
You can now create the secret using the apply command.
kubectl apply -f secret.yamlIf you want to provide plain data and let Kubernetes handle the encoding for you, just use the stringData attribute instead.
apiVersion: v1
kind: Secret
metadata:
  name: plaintext-secret
stringData:
  password: test
Using secrets
To make secrets useful, we first need to make them accessible to our containers. Let’s take a look at the ways we can do that.
Environment variables:
Secret data can be consumed using environment variables in a Pod.
apiVersion: v1
kind: Pod
metadata:
  name: nginx-pod
spec:
  containers:
    - name: nginx
      image: nginx
      env:
        - name: API_KEY
          valueFrom:
            secretKeyRef:
              name: secret-apikey
              key: apikey
The environment variable can then be used after the pod is in the running state.
kubectl exec nginx-pod -- env | grep API_KEYYou can also use all entries of a secret using the envFrom that and passing the secret.
apiVersion: v1
kind: Pod
metadata:
  name: nginx-pod
spec:
  containers:
    - name: nginx
      image: nginx
      envFrom:
        - secretRef:
            name: secret
Volumes:
Secrets can also be mounted to a pod using a Volume.
apiVersion: v1
kind: Pod
metadata:
  name: nginx-pod
spec:
  containers:
    - name: nginx
      image: nginx
      volumeMounts:
        - name: apikey-volume
          mountPath: /secret
          readOnly: true
  volumes:
    - name: apikey-volume
      secret:
        secretName: secret-apikey
The apikey-volume refers back to the secret-apikey. We also specify the mountPath directory that the secret will be stored in and set readOnly to true.
ImagePullSecrets:
When pulling from a private registry, you might need to authenticate before pulling your image. An ImagePullSecrets is a file that stores the authentication data and makes it available to all your nodes when they need to pull a specific image.
apiVersion: v1
kind: Pod
metadata:
  name: private-image
spec:
  containers:
    - name: privateapp
      image: gabrieltanner/graphqltesting
  imagePullSecrets:
    - name: authentification-secret
More information on private Docker registries can be found in this article.
Namespaces
Namespaces are virtual clusters that you can create to manage complex projects and divide cluster resources between multiple users. They provide a scope of names and can be nested within each other.
Managing and using namespaces with kubectl is straight forward. This section will demonstrate the most common actions and commands concerning namespaces.
View existing Namespaces
To display all currently available namespace of your cluster, you can use the kubectl get namespaces command.
kubectl get namespaces

# Output
NAME                   STATUS   AGE
default                Active   32d
docker                 Active   32d
kube-public            Active   32d
kube-system            Active   32d
To get more information about a specific namespace, use the kubectl describe command.
kubectl describe namespace default

# Output
Name:         default
Labels:       <none>
Annotations:  <none>
Status:       Active

No resource quota.

No resource limits
Creating a Namespace
Namespaces can be created by either using the kubectl CLI or by creating a Kubernetes object in YAML.
kubectl create namespace testnamespace

# Output
namespace/testnamespace created
Here is the same functionality using a YAML file.
apiVersion: v1
kind: Namespace
metadata:
  name: testnamespace
You can then apply the configuration file using the kubectl apply command.
kubectl apply -f testNamespace.yamlFiltering by Namespace
When creating a new object in Kubernetes without adding a custom namespace attribute, it will be added to the default namespace.
If you want to create your object in another workspace, you can do it like this.
kubectl create deployment --image=nginx nginx --namespace=testnamespaceYou can now filter for your deployment using the get command.
kubectl get deployment --namespace=testnamespaceChange Namespace using context
You just learned how you can create objects in a namespace that isn’t the default one. But writing the namespace to every command you want to execute is time-consuming and can produce errors.
That is why you can change the default context that your commands will apply by using the set-context command.
kubectl config set-context $(kubectl config current-context) --namespace=testnamespaceYou can verify the changes using the get-context command.
kubectl config get-contexts

# Output
CURRENT   NAME      CLUSTER   AUTHINFO   NAMESPACE
*         Default   Default   Default    testnamespace
Simplifying Kubernetes with Docker Compose
For those of you coming from the Docker community, it might be easier to write Docker Compose files instead of Kubernetes objects. That is where Kompose comes into play. It lets you convert or deploy your docker-compose file to Kubernetes using a simple CLI (command line interface).
Installing Kompose:
Kompose can be installed on all three mature operating systems in a very easy and simple manner.
Linux and Mac users just need to curl the binaries to install Kompose.
# Linux
curl -L https://github.com/kubernetes/kompose/releases/download/v1.21.0/kompose-linux-amd64 -o kompose

# macOS
curl -L https://github.com/kubernetes/kompose/releases/download/v1.21.0/kompose-darwin-amd64 -o kompose

chmod +x kompose
sudo mv ./kompose /usr/local/bin/kompose
On windows, you can download an executable and just run it.
Deploying using Kompose
Kompose takes existing Docker Compose files and deploys them in Kubernetes. Let’s look at an example using the following compose file.
version: "2"
services:
  redis-master:
    image: k8s.gcr.io/redis:e2e
    ports:
      - "6379"
  redis-slave:
    image: gcr.io/google_samples/gb-redisslave:v1
    ports:
      - "6379"
    environment:
      - GET_HOSTS_FROM=dns
  frontend:
    image: gcr.io/google-samples/gb-frontend:v4
    ports:
      - "80:80"
    environment:
      - GET_HOSTS_FROM=dns
    labels:
      kompose.service.type: LoadBalancer
As with Docker Compose, Kompose also allows us to deploy our configuration using a simple command.
kompose upNow you should see the created resources.
kubectl get deployment,svc,pods,pvcConverting a Compose file to Kubernetes Objects
Kompose also has the ability to convert your existing Docker Compose file into the related Kubernetes object.
kompose convertYou can then deploy your application using the apply command.
kubectl apply -f filenamesDemo application deployment
Now that you know the theory and all the vital concepts of Kubernetes, it is time to put that knowledge into practice. This chapter will show you how you can deploy a backend application on Kubernetes.
The specific application in this guide is a GraphQL boilerplate for the Nest.js backend framework.
Let’s start by cloning the repository.
git clone https://github.com/TannerGabriel/nestjs-graphql-boilerplate.gitPushing the images to a Registry
Before we can start with creating the Kubernetes objects, we first need to push the images to a publicly available Image Registry. This can either be a public registry like DockerHub or your own private registry.
If you want to know more about how to set up your own private Docker Image, visit this article.
To push the image, just add the image tag with the registry you want to push it to in your Compose file.
version: '3'

services:
  nodejs:
    build:
      context: ./
      dockerfile: Dockerfile
    image: gabrieltanner.dev/nestgraphql
    restart: always
    environment:
      - DATABASE_HOST=mongo
      - PORT=3000
    ports:
      - '3000:3000'
    depends_on: [mongo]
  mongo:
    image: mongo
    ports:
      - '27017:27017'
    volumes:
      - mongo_data:/data/db

volumes:
  mongo_data: {}
I personally used a private registry I set up earlier, but you can just as well use DockerHub.
Creating the Kubernetes objects
Now that you have pushed your image to a registry let’s continue by writing our Kubernetes objects.
First, create a new directory to store the deployments.
mkdir deployments
cd deployments

touch mongo.yaml
touch nestjs.yaml
The MongoDB service and deployment will then look like this.
apiVersion: v1
kind: Service
metadata:
  name: mongo
spec:
  selector:
    app: mongo
  ports:
    - port: 27017
      targetPort: 27017
---
apiVersion: apps/v1
kind: Deployment
metadata:
  name: mongo
spec:
  selector:
    matchLabels:
      app: mongo
  template:
    metadata:
      labels:
        app: mongo
    spec:
      containers:
        - name: mongo
          image: mongo
          ports:
            - containerPort: 27017
The file contains a deployment object with a single MongoDB container that is labeled mongo. It also contains a service that makes port 27017 available to the Kubernetes network (It cannot be accessed on the host machine but only from other containers in the same namespace).
The Nest.js Kubernetes object is a bit more complicated because the container needs some extra configuration like environment variables and imagePullSecrets.
apiVersion: apps/v1
kind: Deployment
metadata:
  name: nestgraphql
spec:
  replicas: 1
  selector:
    matchLabels:
      app: nestgraphql
  template:
    metadata:
      labels:
        app: nestgraphql
    spec:
      containers:
        - name: app
          image: "gabrieltanner.dev/nestgraphql"
          ports:
            - containerPort: 3000
          env:
            - name: DATABASE_HOST
              value: mongo
          imagePullPolicy: Always
      imagePullSecrets:
            - name: regcred
---
apiVersion: v1
kind: Service
metadata:
  name: nestgraphql
spec:
  selector:
    app: nestgraphql
  ports:
    - port: 80
      targetPort: 3000
  type: LoadBalancer
The service also uses a load balancer to make the port accessible on the host machine.
Deploying the application
Now that the Kubernetes object files are ready to go, let’s deploy them using kubectl.
kubectl apply -f mongo.yaml
kubectl apply -f nestjs.yaml
You should now be able to access the GraphQL playground on localhost/graphql.
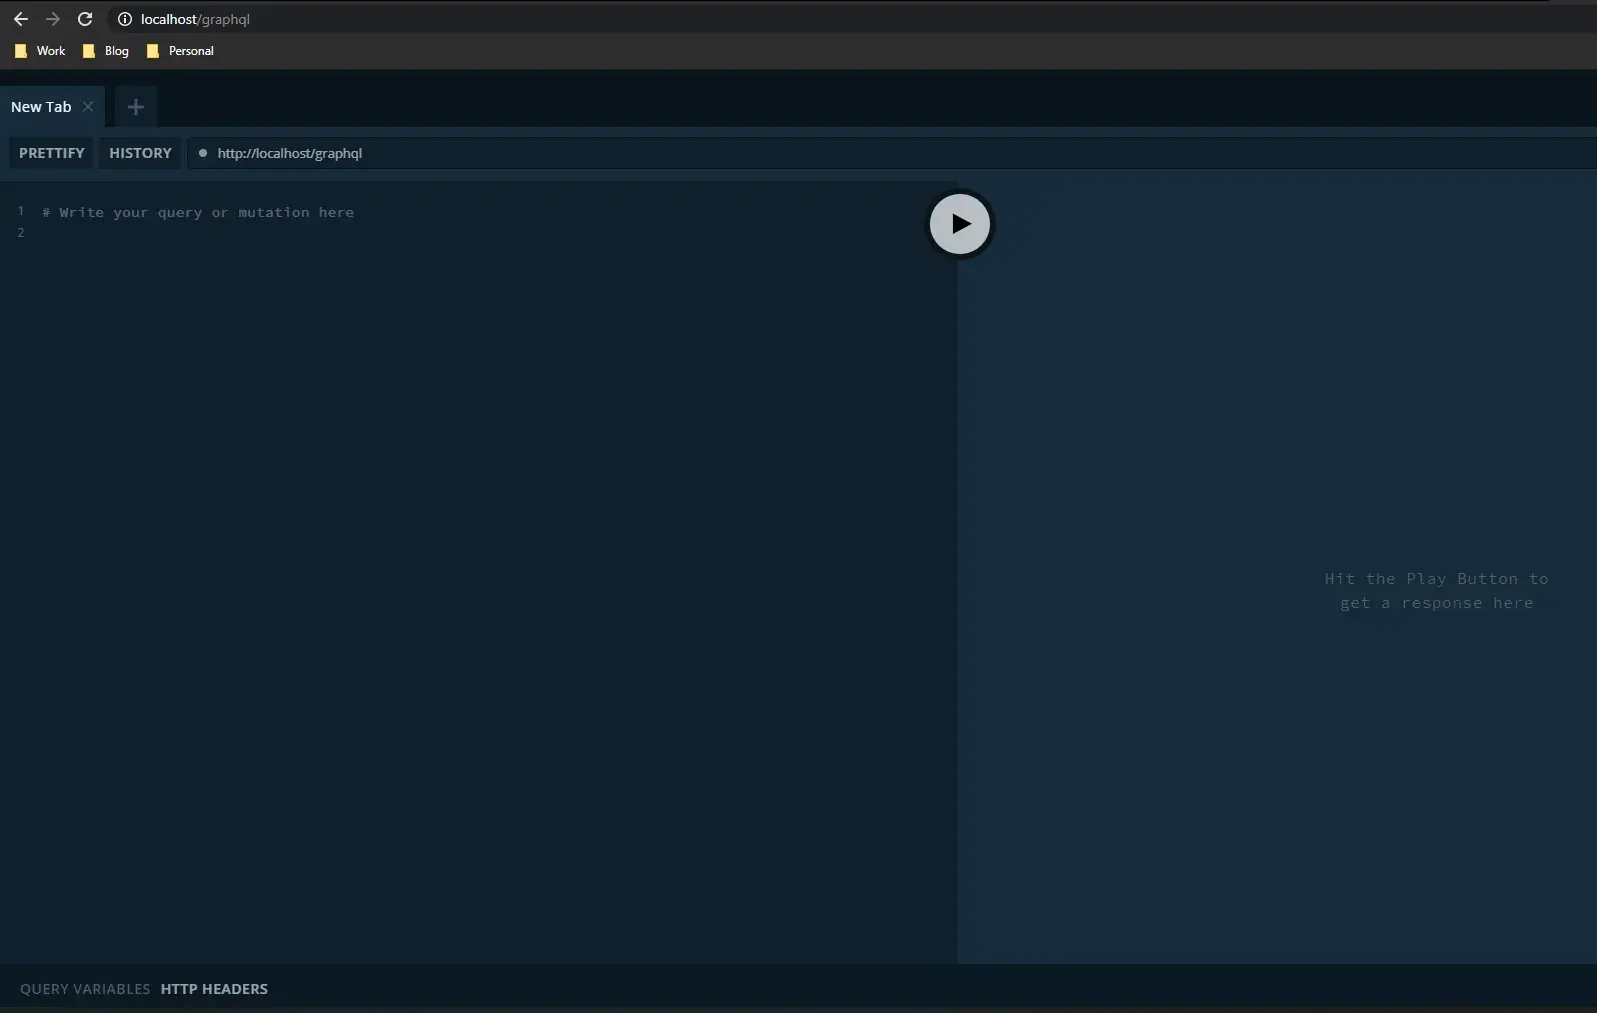
GraphQL playground
Congratulations, you have just deployed your first application on Kubernetes.
Sources
Here is a list of the sources I used for this article:
- Official documentation
- Kubernetes Secrets for storing sensitive
- Kubernetes Deployment Tutorial
- Introduction to Persitent Volumes
- Introduction to YAML: Creating a Kubernetes deployment
Conclusion
You made it all the way until the end! I hope that this article helped you understand Kubernetes and how you can use it to improve your development and deployment workflow as a developer.
If you have found this useful, please consider recommending and sharing it with other fellow developers. If you have any questions or feedback, let me know in the comments down below.