Accessing your local server over the internet from another computer or a mobile device can be challenging, but it doesn’t have to be. FRP is a fast and simple reverse proxy that lets you forward a port of your local server behind a NAT or firewall to a public server.
In this article, you will learn the basic configuration options of FRP and how to expose a port or service of your local server to the internet.
Table of contents
Open Table of contents
Prerequisites
Before you begin this guide, you’ll need the following:
- A local server behind a NAT or firewall (for example a Raspberry Pi)
- A server with a public IP-Address (for example a DigitalOcean Droplet)
What is FRP
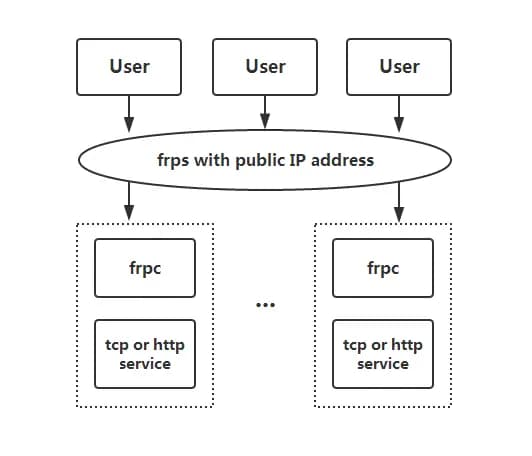
FRP is a fast reverse proxy written in Golang that helps you expose a local server behind a NAT or firewall to the internet by forwarding its port. As of now, it supports TCP and UDP, as well as HTTP and HTTPS protocols.
Here is a visual representation of how the requests will be forwarded to your local server.
Installation
Before starting with the configuration, you will first need to download the newest version of FRP from the releases page according to your operating system.
Once downloaded, extract the folder from the tar.gz file using the following command:
tar -xf foldername.tar.gzYou should now have an FRP folder on your file system, which contains all FRP files you are going to need.
Configure public server
The public server only needs to set the bind_port under the common tag in the frps.ini file (7000 is set as a default value).
[common]
bind_port = 7000
This defines on which port the FRP service will be available for connecting. Now you can start the FRP service on your public server using the following command.
./frps -c ./frps.iniConfigure local server
The local server behind a NAT needs to configure the public server IP-Address, port, and all the services he wants to forward in the frpc.ini file.
Defining the server information under the common flag:
[common]
server_addr = 51.15.241.45
server_port = 7000
Adding a service to forward the ssh port 22 of the NAT server to port 6000 of the public server can be done using the following code.
[ssh]
type = tcp
local_ip = 127.0.0.1
local_port = 22
remote_port = 6000
Let’s break the code down for a better understanding:
- First, you define the name of the service using brackets (ssh in this case)
- Then you define the protocol you want to use to forward the port by setting the
typeparameter - Lastly, you need to define which client port you want to forward to the public server
The same can be done to forward a website or any other service from the NAT server to the public:
[web]
type = tcp
local_ip = 127.0.0.1
local_port = 8080
remote_port = 8080
After finishing your configuration, you can start the FRP service.
./frpc -c ./frpc.iniYou should now be able to connect to your local server over ssh using the following command.
ssh -oPort=6000 [email protected]Note: You need to use the username of your local server and the IP-Address of your public server in the above command.
Enable dashboard
For a visual view of the status information of your FRP service, the official dashboard can be enabled. For that, you just need to configure a port to enable the dashboard in the frpc.ini file on your public server.
[common]
bind_port = 7000
dashboard_port = 7500
# dashboard's username and password are both optional,if not set, default is admin.
dashboard_user = admin
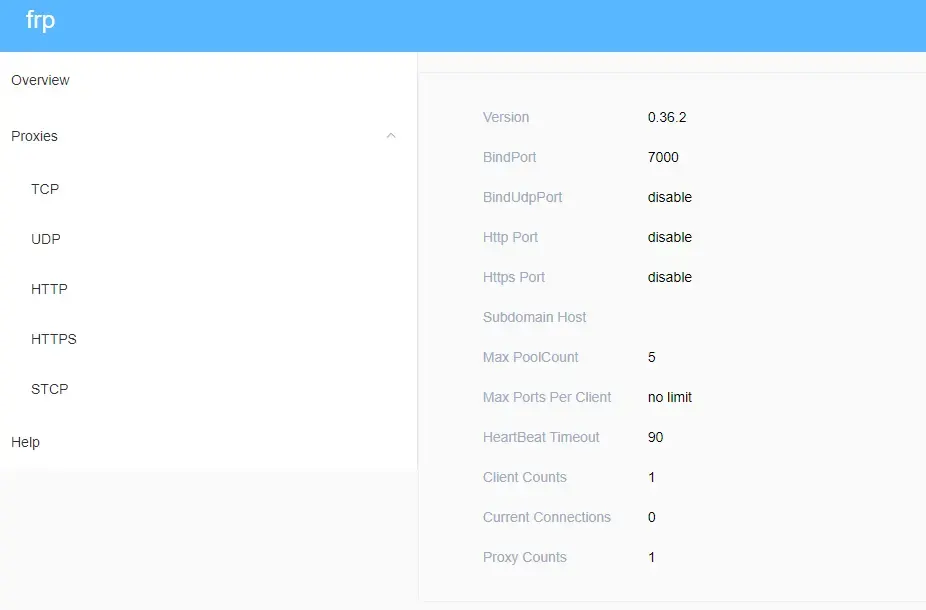
dashboard_pwd = adminAfter restarting the FRP service, you can visit the dashboard in your browser using the following pattern.
SERVER_IP:PORT
# Example 127.0.0.1:7500
After completing the login process, your window should look similar to this.
Bandwidth Limit
A bandwidth limit can be specified for each service.
[ssh]
type = tcp
local_port = 22
remote_port = 6000
bandwidth_limit = 1MB
Here you limit the bandwidth of the ssh service to 1MB using the bandwidth_limit parameter.
Service Health Check
FRP also provides the possibility for service health checks using multiple protocols.
- TCP - Pings the service for availability
- HTTP - Sends an HTTP/2 request and expects the OK status
Here is an example of a TCP health check for our services.
[ssh]
type = tcp
local_ip = 127.0.0.1
local_port = 22
remote_port = 6000
health_check_type = tcp
health_check_timeout_s = 3
health_check_max_failed = 3
health_check_interval_s = 10

[web]
type = tcp
local_ip = 127.0.0.1
local_port = 8080
remote_port = 8080
health_check_type = tcp
health_check_timeout_s = 3
health_check_max_failed = 3
health_check_interval_s = 10
Further information about FRP and how you can use it to forward your services to a public server can be found on the official Github repository.
Conclusion
You made it all the way until the end! I hope that this article helped you understand FRP and how you can use it to expose your local services on a public server.
If you have found this useful, please consider recommending and sharing it with other fellow developers and subscribing to my newsletter. If you have any questions or feedback, let me know using my contact form or contact me on Twitter.