WebRTC is a free, open-source project that provides browsers and mobile applications with real-time communications capabilities via simple APIs.
This article will show you the basic concepts and features of WebRTC and guide you through building your own WebRTC video broadcast using Node.js.
Table of contents
Open Table of contents
Prerequisites
- Experience with Javascript
- Basic Socket.io knowledge
WebRTC basics
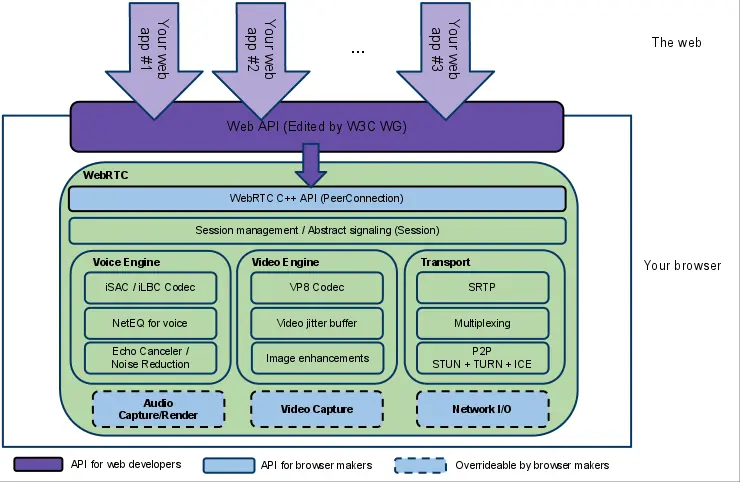
WebRTC enables real-time communication in the web world and is mainly used to transfer video and audio data on the web. Before getting into the code let’s first look at the most important concepts of WebRTC.
Signaling
WebRTC is used for the communication streams in the browser but also needs a mechanism to coordinate communication and to send control messages, a process known as signaling.
Signaling is used for the following tasks:
- To initialize and close communication
- Sharing the network configurations with the outside world (IP-Address, Port)
- Reporting errors in the connection
The signaling methods are not specified by WebRTC and instead can be picked by the developers themselves (This tutorial will use Socket.io).
STUN and TURN servers
STUN and TURN servers are used as a fallback method in case the main WebRTC peer-to-peer connection runs into problems. The STUN server is used to get the IP address of your computer and the TURN server functions as a relay in case the peer-to-peer connection fails.
Now that we know the basic concepts of WebRTC lets continue with developing the project I talked about above.
Signaling using Socket.io
Before we can send the video broadcast over a peer-to-peer connection using WebRTC, we first need to instantiate the connection using a signaling method (Socket.IO in this case).
For that we create the project and install the needed dependencies using npm:
mkdir WebSocketsVideoBroadcast && cd WebSocketsVideoBroadcast
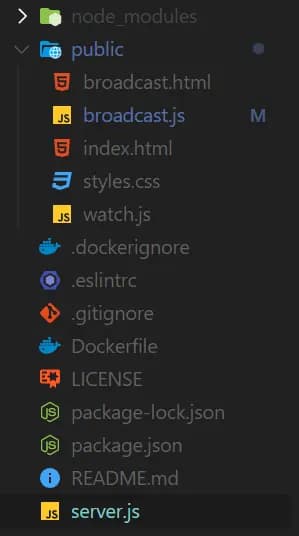
npm install express socket.io --saveAfter that, we create the following folder structure:
We start with a simple Socket.io server skeleton:
const express = require("express");
const app = express();

const port = 4000;

const http = require("http");
const server = http.createServer(app);

const io = require("socket.io")(server);
app.use(express.static(__dirname + "/public"));

io.sockets.on("error", e => console.log(e));
server.listen(port, () => console.log(`Server is running on port ${port}`));
Then we need to implement the connection for the clients and broadcaster to the server. The socket id of the broadcaster is saved into a variable so that we later know where the clients need to connect to.
let broadcaster

io.sockets.on("connection", socket => {
  socket.on("broadcaster", () => {
    broadcaster = socket.id;
    socket.broadcast.emit("broadcaster");
  });
  socket.on("watcher", () => {
    socket.to(broadcaster).emit("watcher", socket.id);
  });
  socket.on("disconnect", () => {
    socket.to(broadcaster).emit("disconnectPeer", socket.id);
  });
});
After that, we will implement the socket.io events to initialize a WebRTC connection. These events will be used by the watchers and broadcaster to instantiate a peer-to-peer connection.
socket.on("offer", (id, message) => {
    socket.to(id).emit("offer", socket.id, message);
});
socket.on("answer", (id, message) => {
  socket.to(id).emit("answer", socket.id, message);
});
socket.on("candidate", (id, message) => {
  socket.to(id).emit("candidate", socket.id, message);
});
That is all for our server implementation of Socket.io now we can continue with the layouts and our watcher and broadcaster implementations.
Layouts
Our layout consists of two basic HTML files that contain a video view that will later display the video stream we are sending and a CSS file for some basic styling.
The index.html file contains a single video view that will display the video stream from the broadcaster. It also imports the socket.io dependency and our watch.js file.
<!DOCTYPE html>
<html>
<head>
	<title>Viewer</title>
	<meta charset="UTF-8" />
	<link href="/styles.css" rel="stylesheet">
</head>
<body>
<video playsinline autoplay></video>
<script src="/socket.io/socket.io.js"></script>
<script src="/watch.js"></script>
</body>
</html>
The broadcast.html file is pretty similar to the main layout but imports the broadcast.js file instead of watch.js.
<!DOCTYPE html>
<html>
<head>
  <title>Broadcaster</title>
  <meta charset="UTF-8" />
  <link href="/styles.css" rel="stylesheet">
</head>
<body>
<video playsinline autoplay muted></video>
<script src="/socket.io/socket.io.js"></script>
<script src="/broadcast.js"></script>
</body>
</html>
I also included some simple CSS styles for the video views.
html {
  overflow: hidden;
  height: 100%;
}

video {
  width: 100%;
  height: 100%;
  position: absolute;
  display: block;
  top: 0;
  left: 0;
  object-fit: cover;
}

body {
  background-color: black;
  margin: 0;
  height: 100%;
  width: 100%;
  position: fixed;
  top: 0;
  left: 0;
  bottom: 0;
  right: 0;
}
RTCPeerConnection
RTCPeerConnections help us with connecting two computers located in a local network with each other. There are a few terms you will hear a lot when talking about these kinds of connections:
- ICE - Internet Connectivity Establishment
- STUN - Session Traversal of User Datagram Protocol (UDP) Through Network Address Translators (NATs)
Since most devices nowadays are behind a NAT router, a direct connection is not possible. That is why the peer connection must be initialized by the STUN server which will return an ICE candidate we can connect with.
In this guide, we have two different parts of the connection. One is the broadcaster which can have multiple peer-to-peer connections to clients and sends the video using a stream. The second one is the client which only has one connection to the current broadcaster.
Broadcaster
First, we create our configuration objects for the peer connection and camera.
const peerConnections = {};
const config = {
  iceServers: [
    {
      urls: ["stun:stun.l.google.com:19302"]
    }
  ]
};

const socket = io.connect(window.location.origin);
const video = document.querySelector("video");

// Media contrains
const constraints = {
  video: { facingMode: "user" }
  // Uncomment to enable audio
  // audio: true,
};
We use the official google STUN server for our peer-to-peer connection and configure our camera using the media constraints. You can also enable the audio by uncommenting the audio line.
Before we create our peer-to-peer connection we first need to get the video from the camera, so we can add it to our connection.
navigator.mediaDevices
  .getUserMedia(constraints)
  .then(stream => {
    video.srcObject = stream;
    socket.emit("broadcaster");
  })
  .catch(error => console.error(error));
Next, we will create an RTCPeerConnection using the following code:
socket.on("watcher", id => {
  const peerConnection = new RTCPeerConnection(config);
  peerConnections[id] = peerConnection;

  let stream = video.srcObject;
  stream.getTracks().forEach(track => peerConnection.addTrack(track, stream));

  peerConnection.onicecandidate = event => {
    if (event.candidate) {
      socket.emit("candidate", id, event.candidate);
    }
  };

  peerConnection
    .createOffer()
    .then(sdp => peerConnection.setLocalDescription(sdp))
    .then(() => {
      socket.emit("offer", id, peerConnection.localDescription);
    });
});

socket.on("answer", (id, description) => {
  peerConnections[id].setRemoteDescription(description);
});

socket.on("candidate", (id, candidate) => {
  peerConnections[id].addIceCandidate(new RTCIceCandidate(candidate));
});
We create a new RTCPeerConnection every time a new client joins and save it in our peerConnections object.
Then we add the local stream to the connection using the addTrack() method and passing our stream and track data.
The peerConnection.onicecandidate event is called when we receive an ICE candidate, and we send it to our server.
After that, we send a connection offer to the client by calling peerConnection.createOffer() and we call peerConnection.setLocalDescription() to configure the connection.
Closing the connection when a client disconnects is another vital part of the application and we can do so using the following code:
socket.on("disconnectPeer", id => {
  peerConnections[id].close();
  delete peerConnections[id];
});
Lastly, we will close the socket connection if the user closes the window.
window.onunload = window.onbeforeunload = () => {
  socket.close();
};
Watcher (Client)
The watcher has pretty much the same functionality. The only difference is that he only opens one peer connection to the current broadcaster and that he gets the video instead of streaming it.
We also need to create a configuration for our RTCPeerConnection.
let peerConnection;
const config = {
  iceServers: [
    {
      urls: ["stun:stun.l.google.com:19302"]
    }
  ]
};

const socket = io.connect(window.location.origin);
const video = document.querySelector("video");
We can then create our RTCPeerConnection and get the video stream from the broadcaster.
socket.on("offer", (id, description) => {
  peerConnection = new RTCPeerConnection(config);
  peerConnection
    .setRemoteDescription(description)
    .then(() => peerConnection.createAnswer())
    .then(sdp => peerConnection.setLocalDescription(sdp))
    .then(() => {
      socket.emit("answer", id, peerConnection.localDescription);
    });
  peerConnection.ontrack = event => {
    video.srcObject = event.streams[0];
  };
  peerConnection.onicecandidate = event => {
    if (event.candidate) {
      socket.emit("candidate", id, event.candidate);
    }
  };
});
Here we create a new RTCPeerConnection using our configuration object as we did above. The only difference is that we call the createAnswer() function to send back a connection answer to the request of the broadcaster.
After the connection is established we can continue by getting the video stream using the ontrack event listener of the peerConnection object.
We also need to implement the other lifecycle functions for our peer-to-peer connection that will help us open and close new connections.
socket.on("candidate", (id, candidate) => {
  peerConnection
    .addIceCandidate(new RTCIceCandidate(candidate))
    .catch(e => console.error(e));
});

socket.on("connect", () => {
  socket.emit("watcher");
});

socket.on("broadcaster", () => {
  socket.emit("watcher");
});

window.onunload = window.onbeforeunload = () => {
  socket.close();
  peerConnection.close();
};
At this point the application is complete and you can continue testing it in your browser.
Testing the application
Now that we have finished the application it is time to test it out and see if it works.
We can start the application using the following command:
node server.jsThe application should now be running on your localhost:4000 and you test it by connecting to localhost:4000/broadcast to add a new broadcaster.
After that, you just need to visit localhost:4000 to connect to the server as a client and you should get the video that is streamed from the broadcaster.
The full code of this application can also be found on my Github. The repository also contains some modifications like the ability to select the camera you stream from.
Conclusion
You made it all the way until the end! I hope that this article helped you understand the basics of WebRTC and how you can use it to stream video broadcasts.
If you have found this useful, please consider recommending and sharing it with other fellow developers. If you have any questions or feedback, let me know using my contact form or contact me on Twitter.