WebRTC uses peer-to-peer connections to transfer data, but what happens if a direct connection between two PCs isn’t possible because they are not on the same network or have problems with a NAT or some kind of firewall?
TURN, which stands for Traversal Using Relays around NAT, is used to relay the traffic between peers even if they cannot connect directly. TURN is also vital for security reasons because you obscure the client’s actual address.
In this article, you will set up your own TURN server using Coturn and secure it using a username and password. You will also learn how to add a domain to your TURN server and run the server using Docker.
Prerequisites
Before you begin this guide, you’ll need the following:
- A Linux server with a public IP-Address
- (Optional): Docker installation for a more straightforward creation process of the TURN server without the need to install Coturn on your server
- (Optional): A custom domain name
Step 1 - Installing Coturn
Coturn is an open-source STUN and TURN implementation that is free, highly configurable and well-supported by the community.
In this section, you will install Coturn on your machine and enable the process as an automated system daemon.
First, you will update your OS’s repository versions to the latest version by running the apt-get update command.
sudo apt-get update -yThen you can continue installing coturn using the following command.
sudo apt-get install coturnIf you want Coturn to autostart whenever you turn on your server, you have to modify the /etc/default/coturn file.
sudo nano /etc/default/coturnFind the following line and uncomment it to run Coturn as an automatic system service daemon.
TURNSERVER_ENABLED=1Once you’re done, save and exit the file.
You should now be able to start the coturn service using the following command.
systemctl start coturnStep 2 - Configuring Coturn
Now that you have Coturn up and running, it is time to make some basic configurations like defining your external IP-Address and adding basic authentication.
Before we start modifying, it is recommended first to make a safety copy of your original configuration, so you can always go back if something is not working out.
mv /etc/turnserver.conf /etc/turnserver.conf.backupThis command will rename the original config file from /etc/turnserver.conf to /etc/turnserver.conf.backup.
Next, we will create an empty file in the same directory that will contain our configuration.
nano /etc/turnserver.confAdd the following content to define your Coturn server realm and server name. Replace the placeholder values according to your needs.
# TURN server name and realm
realm=<DOMAIN>
server-name=<SERVER_NAME>
After that, add the external-ip key to define your server’s IP-Address and the listening-ip key to specify which IP-Addresses the Coturn server should listen to (0.0.0.0 tells the server to listen to all IP-Addresses).
# IPs the TURN server listens to
listening-ip=0.0.0.0

# External IP-Address of the TURN server
external-ip=IP_ADDRESS
Next you can define the port your server will listen on and the ports for further configuration.
# Main listening port
listening-port=3478

# Further ports that are open for communication
min-port=10000
max-port=20000
Then you can continue by defining the directory for your logs and enable the verbose logging mode.
# Use fingerprint in TURN message
fingerprint

# Log file path
log-file=/var/log/turnserver.log

# Enable verbose logging
verbose
Lastly, you can enable authentication for your TURN server using the user and lt-cred-mech keys.
# Specify the user for the TURN authentication
user=test:test123

# Enable long-term credential mechanism
lt-cred-mech
These configuration blocks will result in the following file:
# TURN server name and realm
realm=DOMAIN
server-name=turnserver

# Use fingerprint in TURN message
fingerprint

# IPs the TURN server listens to
listening-ip=0.0.0.0

# External IP-Address of the TURN server
external-ip=IP_ADDRESS

# Main listening port
listening-port=3478

# Further ports that are open for communication
min-port=10000
max-port=20000

# Log file path
log-file=/var/log/turnserver.log

# Enable verbose logging
verbose

# Specify the user for the TURN authentification
user=test:test123

# Enable long-term credential mechanism
lt-cred-mech

# If running coturn version older than 4.5.2, uncomment these rules and ensure
# that you have listening-ip set to ipv4 addresses only.
# Prevent Loopback bypass https://github.com/coturn/coturn/security/advisories/GHSA-6g6j-r9rf-cm7p
#denied-peer-ip=0.0.0.0-0.255.255.255
#denied-peer-ip=127.0.0.0-127.255.255.255
#denied-peer-ip=::1
Once you’re done, save and exit your file.
You can further customize your configuration for your own needs by changing the give keys’ values or by adding new ones. You can reference the original configuration, which provides essential documentation for the most important options.
After finishing your configuration, you can restart the Coturn server to apply the changes.
sudo service coturn restartStep 3 - Testing TURN server
The functionality of STUN and TURN servers can be tested using the Trickle ICE. The tool tries out your TURN server functionality by creating a peer connection featuring your TURN server information and then starts gathering candidates for the WebRTC session.
If candidates are gathered, they will be displayed in the text box below.
Now start by opening the website in your browser and adding your TURN server information into the input form. The format will look like the following:
turn:TURN_IP:TURN_PORTAlso make sure that you provide the username and password in the respective fields.
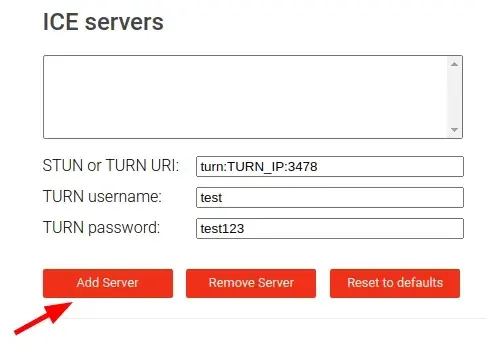
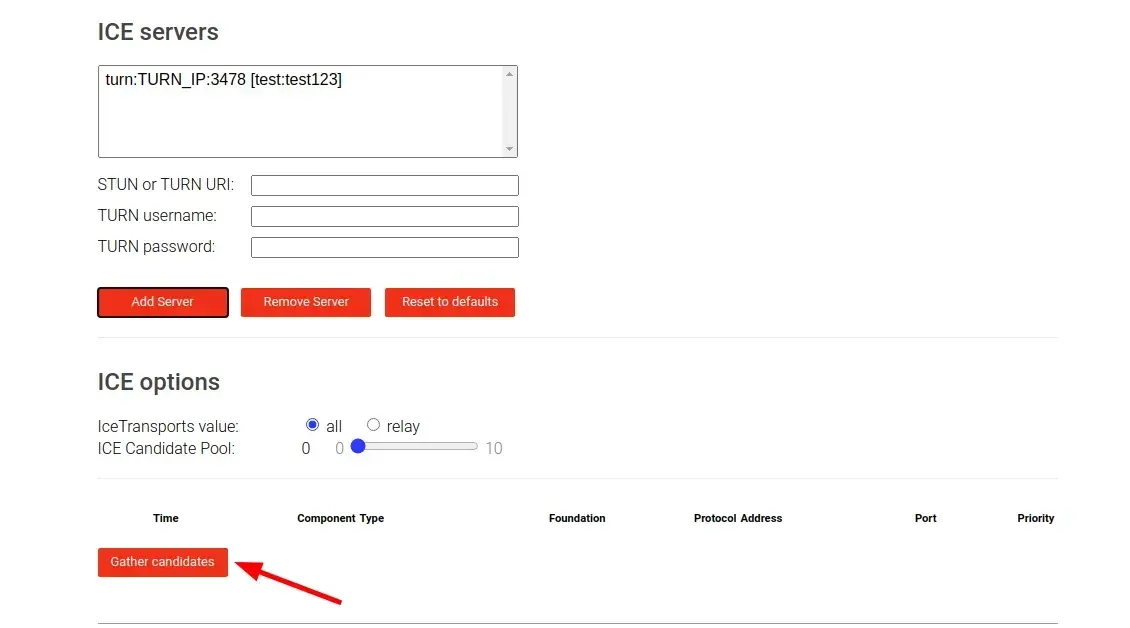
After filling in the information about your TURN server and adding it to the list using the “Add server” button you can continue by clicking the “Gather candidates” button to run the test.
You should now see the results of the test displayed at the bottom of the page looking similar to this:
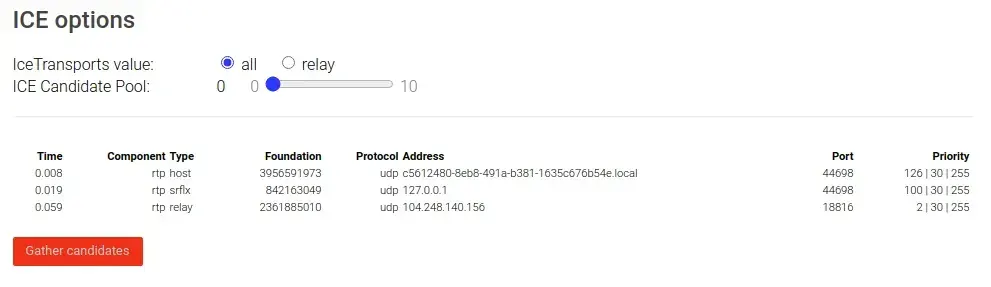
Congratulations you have now successfully set up and secured your TURN server and are ready to use it in your applications. But there are still other options you can configure like adding a domain and securing the server using SSL certificates which we will look at in the next section.
You can also deploy Coturn using Docker instead of the regular deployment. The docker deployment will make it easier to change your Coturn server’s version and deploy it on multiple machines, no matter the operating system.
Step 4 (Optional) - Adding a Domain to the Coturn server
Now that you can access your TURN server over your public IP-Address it is time to add your Domain to the TURN server and secure the connection using an SSL certificate generated by LetsEncrypt.
Securing the server will also allow you to access the TURN server from secure HTTPS sites, which is impossible without the certificate.
Adding DNS records to your Domain
First, you will add DNS records pointing your Domain to the IP-Address of the TURN server.

After adding the DNS record and waiting the required time until the records can be found using DNS lookup you are ready to continue.
Creating an SSL certificate
LetsEncrypts certbot can be used to quickly generate free SSL certificates that automatically renew themselves before running out.
Certbot can be installed using the following commands:
sudo add-apt-repository ppa:certbot/certbot
sudo apt-get update
sudo apt-get install certbot
After successfully installing certbot, you can generate a certificate using the following command.
sudo certbot certonly --standalone --preferred-challenges http \
    --deploy-hook "systemctl restart coturn" \
    -d <YOUR_DOMAIN>
Here we request a standalone certificate and tell certbot that it should automatically restart coturn whenever the certificate is renewed. This will ensure that the TURN server’s certificate is always up to date but has the disadvantage that all ongoing TURN connections will be interrupted.
If you don’t want this to happen, you can disable the automatic renewal of the certificate.
Adding the SSL certificate to your config
Now that you have generated an SSL certificate it is time to add it to your configuration. For that, you need to add three parameters:
# SSL certificates
cert=/etc/letsencrypt/live/<DOMAIN>/cert.pem
pkey=/etc/letsencrypt/live/<DOMAIN>/privkey.pem

# 443 for TURN over TLS, which can bypass firewalls
tls-listening-port=443
These three parameters combined with the previous configuration should leave you with this.
# TURN server name and realm
realm=<DOMAIN>
server-name=<DOMAIN>

# Use fingerprint in TURN message
fingerprint

# IPs the TURN server listens to
listening-ip=0.0.0.0

# External IP-Address of the TURN server
external-ip=IP_ADDRESS

# Main listening port
listening-port=3478

# Further ports that are open for communication
min-port=10000
max-port=20000

# Log file path
log-file=/var/log/turnserver.log

# Enable verbose logging
verbose

# Specify the user for the TURN authentification
user=test:test123

# Enable long-term credential mechanism
lt-cred-mech

# SSL certificates
cert=/etc/letsencrypt/live/<DOMAIN>/cert.pem
pkey=/etc/letsencrypt/live/<DOMAIN>/privkey.pem

# 443 for TURN over TLS, which can bypass firewalls
tls-listening-port=443

# If running coturn version older than 4.5.2, uncomment these rules and ensure
# that you have listening-ip set to ipv4 addresses only.
# Prevent Loopback bypass https://github.com/coturn/coturn/security/advisories/GHSA-6g6j-r9rf-cm7p
#denied-peer-ip=0.0.0.0-0.255.255.255
#denied-peer-ip=127.0.0.0-127.255.255.255
#denied-peer-ip=::1
Step 5 (Optional) - Running TURN server using Docker
If you want to run Coturn on Docker instead of installing it on your machine and managing it as a normal process, you can do so using the following command.
docker run -d --network=host \
            -v $(pwd)/turnserver.conf:/etc/coturn/turnserver.conf \
        instrumentisto/coturn
Here you run the official coturn docker image instrumentisto/coturn and provide your config using a volume. The host network option is used so the container networking is not isolated from the host networking and therefore doesn’t get its own IP-Address.
If you do not want to use the network=host option you can remove it and specify the used ports instead.
Another option is to define your Docker configuration inside a docker-compose file that makes it easier to run the same configuration multiple times.
version: '3'
services:
  coturn_server:
    image: coturn/coturn:4.5.2
    restart: always
    network_mode: "host"
    volumes:
      - ./turnserver.conf:/etc/coturn/turnserver.conf
You can then start the application using the following command:
docker-compose up -dResources
The resources used for writing this article:
- Coturn Documentation
- Configure TURN - Big blue button
- WebRTC for the curious
Conclusion
In this article, you installed and configured Coturn on your Linux server and tested the functionality using the WebRTC Trickle ICE tool.
If you are interested in learning more, consider subscribing to my email list to never miss another article. Also, feel free to leave some feedback or check out my other articles.