In this tutorial, we’re going to build a realtime drawing app, that enables users to draw together on a project.
The application is built using an Express js server and p5.js for the drawing features. Client-side communication is handled through WebSockets namely Socket.IO.
So, without wasting any further time, let’s get started.
Table of contents
Open Table of contents
Setup
Before we can start coding, we first need to set up our project and install all the needed dependencies. For that, you need to open your terminal and run the following commands.
First, we need to create a directory and cd into it.
mkdir drawingapp
cd drawingapp
After that, we can start installing the dependencies and creating the needed files.
npm initNpm will ask you some questions, just answer them and continue on with the guide.
npm install express p5 socket.io --saveNow, you need to create the folder structure and files needed for the project. Here’s an image of my folder structure.
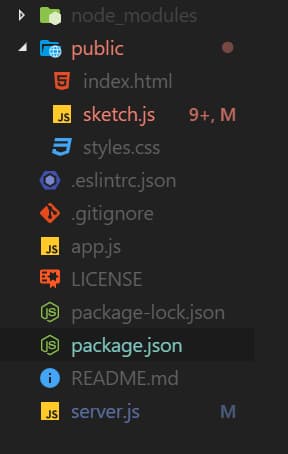
You can also find the structure on my Github.
Voilà, the initial setup is done, so we can start creating our layout, and implementing the drawing functionality.
Application Layout
Now that we have the project set up, let’s start creating the layout in our index.html file.
<!DOCTYPE html>
<html>

<head>
  <meta charset="UTF-8" />
  <title>Websockets drawing app</title>
  <link rel="stylesheet" type="text/css" href="styles.css" />
  <script type="text/javascript" src="https://cdnjs.cloudflare.com/ajax/libs/socket.io/4.0.1/socket.io.js"></script>
  <script type="text/javascript" src="https://cdnjs.cloudflare.com/ajax/libs/p5.js/1.3.1/p5.min.js"></script>
  <script type="text/javascript" src="https://cdnjs.cloudflare.com/ajax/libs/p5.js/1.3.1/addons/p5.sound.min.js"></script>
  <script type="text/javascript" src="sketch.js"></script>
</head>

<body>
  <p>Choose color (# hex)</p>
  <input type="text" name="custom_color" placeholder="#FFFFFF" id="pickcolor" class="call-picker" />
  <div id="color-holder" class="color-holder call-picker"></div>
  <button id="color-btn">Change color</button>
  <br />
  <p>Choose stroke width</p>
  <input type="text" name="stroke_width" placeholder="4" id="stroke-width-picker" class="stroke_width_picker" />
  <button id="stroke-btn">Change stroke width</button>
</body>
</html>
Here, we just create a basic HTML file with two input fields. We’ll use these later on to change the color and width of our stroke.
Let’s also add some basic CSS styling to our application to make the import fields and buttons look better.
input.call-picker {
  border: 1px solid #AAA;
  color: #666;
  text-transform: uppercase;
  float: left;
  outline: none;
  padding: 10px;
  text-transform: uppercase;
  width: 85px;
}

.color-picker {
  width: 130px;
  background: #F3F3F3;
  height: 81px;
  padding: 5px;
  border: 5px solid #fff;
  box-shadow: 0px 0px 3px 1px #DDD;
  position: absolute;
  top: 61px;
  left: 2px;
}

.color-holder {
  background: #fff;
  cursor: pointer;
  border: 1px solid #AAA;
  width: 40px;
  height: 36px;
  float: left;
  margin-left: 5px;
}

input.stroke_width_picker {
  border: 1px solid #AAA;
  color: #666;
  text-transform: uppercase;
  float: left;
  outline: none;
  padding: 10px;
  text-transform: uppercase;
  width: 85px;
}

p {
  margin-top: 2rem;
  margin-bottom: 2rem;
}
button {
  margin-left: 1rem;
}
After that, we can start implementing our drawing features using the p5.js library.
Drawing Functionality
P5.js is a JavaScript processing library, with the goal to make coding accessible to artists and designers.
It provides a full set of drawing functionalities, and even its own dom (Document Object Model). In this tutorial we will use it to create and manage our drawing canvas, as well as adding event listeners, to the two buttons we added above.
Adding canvas
First, you need to create a sketch.js file in your public folder, if you haven’t already. Then we can start by implementing the basic p5 setup() function.
function setup() {}After that, we can start by creating a drawing canvas and positioning it on our page.
const cv = createCanvas(800, 600)
cv.position(600, 100)
cv.background(0)
Implementing drawing
Now, we continue implementing the mouseDragged() function, so we can draw when the user clicks on the canvas.
function mouseDragged() {
 // Draw
 stroke(color)
 strokeWeight(strokeWidth)
 line(mouseX, mouseY, pmouseX, pmouseY)
}
Here, we set the color and width of our stroke, and then draw a line using the coordinates we get through our p5 library.
Adding button listeners
We just need to get the color and stroke width from our input fields, using the p5.js dom. For that, we need to add an onclick listener to our two buttons, and then get the input from the field.
We start by creating two variables on top of our script to hold the color and stroke width, and assign them a default value.
let color = '#FFF'
let strokeWidth = 4
We get our buttons and inputs, using the select() function provided by the p5.js dom.
// Getting our buttons and the inputs through the p5.js dom
const color_picker = select('#pickcolor')
const color_btn = select('#color-btn')
const color_holder = select('#color-holder')
const stroke_width_picker = select('#stroke-width-picker')
const stroke_btn = select('#stroke-btn')
After that, we add a mousePressed listener to our buttons, which will be executed whenever the button is clicked. Then we validate the current input value and save it into our variable if it is valid.
// Adding a mousePressed listener to the buttoncolor_btn.mousePressed(() => {
 // Checking if the input is a valid hex color
 if (/(^#[0-9A-F]{6}$)|(^#[0-9A-F]{3}$) /i.test(color_picker.value())){
  color = color_picker.value()
  color_holder.style('background-color', color)
}
 else {console.log('Enter a valid hex value')}
}
// Adding a mousePressed listener to the button
stroke_btn.mousePressed(() => {
 const width = parseInt(stroke_width_picker.value())
 if (width > 0) strokeWidth = width
})
Complete Source Code For Sketch.js
This is the complete source code we wrote so far.
let color = '#FFF'
let strokeWidth = 4

function setup() {
	// Creating canvas
	const cv = createCanvas(800, 600)
	cv.position(600, 100)
	cv.background(0)

	// Getting our buttons and the holder through the p5.js dom
	const color_picker = select('#pickcolor')
	const color_btn = select('#color-btn')
	const color_holder = select('#color-holder')

	const stroke_width_picker = select('#stroke-width-picker')
	const stroke_btn = select('#stroke-btn')

	// Adding a mousePressed listener to the button
	color_btn.mousePressed(() => {
		// Checking if the input is a valid hex color
		if (/(^#[0-9A-F]{6}$)|(^#[0-9A-F]{3}$)/i.test(color_picker.value())) {
			color = color_picker.value()
			color_holder.style('background-color', color)
		}
		else {console.log('Enter a valid hex value')}
	})

	// Adding a mousePressed listener to the button
	stroke_btn.mousePressed(() => {
		const width = parseInt(stroke_width_picker.value())
		if (width > 0) strokeWidth = width
	})
}

function mouseDragged() {
	// Draw
	stroke(color)
	strokeWeight(strokeWidth)
	line(mouseX, mouseY, pmouseX, pmouseY)
}
Adding the Server Side
Now let’s look at how we can use Express js to run our drawing application in the browser.
First we need to create a basic express server and listen to it on a port on our PC. We will do so in our server.js file.
const http = require('http')
const express = require('express')
const app = express()
app.set('port', '3000')
const server = http.createServer(app)
server.on('listening', () => {
 console.log('Listening on port 3000')
})
server.listen('3000')
Now we only need to tell our app to use the resources located in the public folder.
app.use(express.static('public'))After that, we can test our app by running the node server command in our command line.
After running it you should see a black drawing canvas in the middle of your screen when you visit http://localhost:3000/ in your browser, and you should be able to draw on it.
Complete Source Code for the Server.js file
const http = require('http')
const express = require('express')

const app = express()
app.use(express.static('public'))

app.set('port', '3000')

const server = http.createServer(app)
server.on('listening', () => {
 console.log('Listening on port 3000')
})

server.listen('3000')
Socket.IO
Now that we have finished building the drawing functionality and the server, let’s take a look at how to use Socket.IO, to enable real-time communication between the users.
Socket.IO setup
First, let’s look at how we can set up Socket IO in our project, and how we can listen to our own events.
For that, we need to import Socket.IO in our server.js and pass the server variable to it.
const io = require('socket.io')(server)After that, we need to add some listeners to our socket, so we can react to events like sending data.
io.sockets.on('connection', (socket) => {
 console.log('Client connected: ' + socket.id)
 socket.on('mouse', (data) => socket.broadcast.emit('mouse', data))
 socket.on('disconnect', () => console.log('Client has disconnected'))
})
Note that the mouse event is a custom event that we will create in our sketch.js file later on. Socket.broadcast.emit is used to send out the data to all sockets that are currently online, except the socket that is sending it.
Using Socket.IO in sketch.js
Next, we need to create the client-side implementation of Socket.IO.
For that, we need to create a socket variable that will hold our Socket.IO client.
let socketWe then initialize a socket by calling the connect() function on our IO object and passing it the URL our website runs on (in this example localhost:3000).
// Start the socket connection
socket = io.connect('http://localhost:3000')
We can now start sending our data to all the other sockets that are currently online, by getting our drawing data and sending it using the emit() function.
// Sending data to the socket
function sendmouse(x, y, pX, pY) {
 const data = {
  x: x,
  y: y,
  px: pX,
  py: pY,
  color: color,
  strokeWidth: strokeWidth,
 }
 socket.emit('mouse', data)
}
Emit takes to the parameters ID (of the event it should be sent to. In our case mouse as we defined in the server.js file) and the data we want to send.
Now, we only need to call the function whenever we draw in our mouseDragged() function.
sendmouse(mouseX, mouseY, pmouseX, pmouseY)After that, we just need to get the data, which is sent by other sockets. We can do so by listening to our mouse event, which will be called whenever a socket sends out data. Then we just need to draw the lines with the data we receive.
socket.on('mouse', data => {
 stroke(data.color)
 strokeWeight(data.strokeWidth)
 line(data.x, data.y, data.px, data.py)
})
That’s it! Now you just need to test your application by opening it in multiple windows and drawing in them.
Complete Code
Sketch.js
let socket
let color = '#FFF'
let strokeWidth = 4

function setup() {
	// Creating canvas
	const cv = createCanvas(800, 600)
	cv.position(600, 100)
	cv.background(0)

	// Start the socket connection
	socket = io.connect('http://localhost:3000')

	// Callback function
	socket.on('mouse', data => {
		stroke(data.color)
		strokeWeight(data.strokeWidth)
		line(data.x, data.y, data.px, data.py)
	})

	// Getting our buttons and the holder through the p5.js dom
	const color_picker = select('#pickcolor')
	const color_btn = select('#color-btn')
	const color_holder = select('#color-holder')

	const stroke_width_picker = select('#stroke-width-picker')
	const stroke_btn = select('#stroke-btn')

	// Adding a mousePressed listener to the button
	color_btn.mousePressed(() => {
		// Checking if the input is a valid hex color
		if (/(^#[0-9A-F]{6}$)|(^#[0-9A-F]{3}$)/i.test(color_picker.value())) {
			color = color_picker.value()
			color_holder.style('background-color', color)
		}
		else {console.log('Enter a valid hex value')}
	})

	// Adding a mousePressed listener to the button
	stroke_btn.mousePressed(() => {
		const width = parseInt(stroke_width_picker.value())
		if (width > 0) strokeWidth = width
	})
}

function mouseDragged() {
	// Draw
	stroke(color)
	strokeWeight(strokeWidth)
	line(mouseX, mouseY, pmouseX, pmouseY)

	// Send the mouse coordinates
	sendmouse(mouseX, mouseY, pmouseX, pmouseY)
}

// Sending data to the socket
function sendmouse(x, y, pX, pY) {
	const data = {
		x: x,
		y: y,
		px: pX,
		py: pY,
		color: color,
		strokeWidth: strokeWidth,
	}

	socket.emit('mouse', data)
}
Server.js
const http = require('http')
const express = require('express')

const app = express()
app.use(express.static('public'))

app.set('port', '3000')

const server = http.createServer(app)
server.on('listening', () => {
 console.log('Listening on port 3000')
})

// Web sockets
const io = require('socket.io')(server)

io.sockets.on('connection', (socket) => {
	console.log('Client connected: ' + socket.id)

	socket.on('mouse', (data) => socket.broadcast.emit('mouse', data))

	socket.on('disconnect', () => console.log('Client has disconnected'))
})

server.listen('3000')
The whole project can also be found on my Github.
Conclusion
I hope this article helped you understand the basics of SocketIO and how you can use it in your projects.
If you have any questions or feedback, let me know in the comments down below.