Prisma is a modern ORM replacement that turns a database into a fully functional GraphQL, REST or gRPC API. It provides powerful abstractions and building blocks to develop flexible and scalable backends.
In this post, we will take a look at the most important concepts of Prisma and even build a little sample application to give you some practice using it. We will focus on GraphQL whenever we look at practical examples.
So, without wasting any further time, let’s get started.
Table of contents
Open Table of contents
Why care about Prisma
Now the question remains why you should use Prisma in the first place. Here are some reasons why developers should consider using Prisma and where it can be of help.
Typesafe
Prisma provides a type-safe API that can be used from the front and backend including filters, aggregations, and transactions. This drastically increases the intelligent auto-completion or jump-to-definition features of IDEs and also makes code generation easier.
SDL (Schema definition language)
Prisma lets you define your models using their modern SDL and migrates your underlying database automatically. It provides a concise and powerful way to specify your GraphQL schema. For more information refer to this article from the official Prisma blog.
Simple database workflows
Prisma’s overall goals are to remove complexity from database workflows and simplify data access in your applications by providing:
- Simple and powerful API for working with relational data
- Visual data management using Prisma Admin
- Automatic database migrations
- Easy data import and export
Clean and layer architecture
Prisma provides a clean architecture which respects synchronization, query optimization/performance and security. They do so by providing a build-in DAT (data access layer) which is used to abstract the complexity of the database access so that the developers can focus on their data instead of worrying about how to store and retrieve it from the database.

Datamodel
The datamodel defines the underlying database schema and thus is the foundation for all the auto-generated CRUD operations of your Prisma client.
The data model is written using a subset of the GraphQL SDL and stored in files with the .prisma file extension. These files need to be referred to in your prisma.yml file under the datamodel property.
datamodel: datamodel.prismaBuilding blocks
Now, let’s take a look at the building blocks of our datamodel:
- Types — Types consist of multiple fields which have a type and typically represent entities from your application domain (e.g. User, Task). Each type is mapped to a database table and has auto-generated CRUD operations.
- Directives — Directives are used to provide additional information or add specific behavior to the types in our datamodel.
- Relations — A relation describes the relationship between two types.
Example
A simple example of a database.prisma file:
type Post {
 id: ID! @id
 published: Boolean! @default(value: false)
 title: String!
 content: String!
 author: User!
}

type User {
 id: ID! @id
 email: String! @unique
 password: String!
 posts: [Post!]!
}
This example contains a few important concepts of datamodels:
- One-to-many relationship between the User and Post
- All fields are required as indicated by the ! operator
- The fields use annotations such as @id to make them readonly in the exposed Prisma API
- The @unique directive ensures that there will never be two records with the same value
- The two types are mapped to database tables
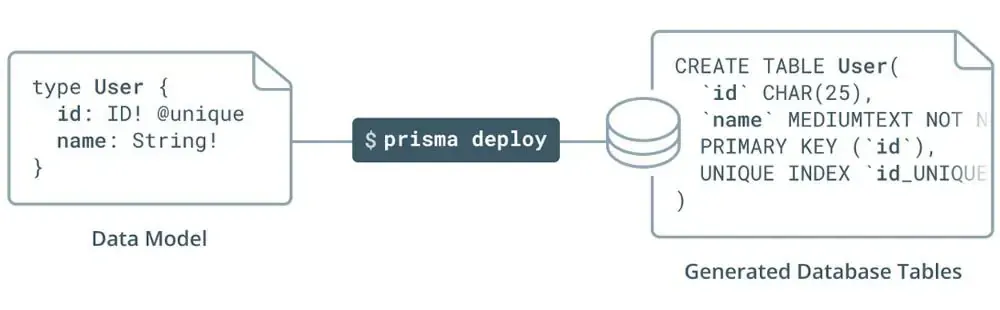
Here is a visual representation of how the types will be mapped to database tables:
For more information on the Prisma datamodel, I recommend visiting the official documentation.
Prisma client
The Prisma client is an auto-generated library which replaces typical ORMs in your API. It provides the connection between the client and the Prisma server which sits on top of the database.

It provides a seamless API which lets you work with your relational data, JOINs and transactions.
It can be generated using the prisma generate command provided by the Prisma API. We can also change the configurations by editing the prisma.yml file.
generate:
 - generator: typescript-client
   output: ../src/generated/prisma-client
In this example, we define that our client should be generated in typescript and in which folder the output should be saved.
Now that we know the basics of the client let’s look at how we can use it for basic data access and manipulation.
Defining data
The Prisma client is auto-generated from the datamodel.prisma file and exposes CRUD functionality to all of its models.
For the following sections let’s consider that we have this datamodel:
type Post {
 id: ID! @id
 createdAt: DateTime! @createdAt
 updatedAt: DateTime! @updatedAt
 title: String!
 published: Boolean! @default(value: false)
 author: User
}

type User {
 id: ID! @id
 name: String
 email: String! @unique
 posts: [Post!]!
}
Reading data
Whenever you query a database record from the Prisma client you automatically get all the scalar fields of your record. That means that by default you only get fields which aren’t considered as relations (e.g. we only get the id, name and email when we query our User record)
Fetching all records:
const users: User[] = await prisma.users()Here we are fetching all the users from our database and save them into an array.
Fetching a single record:
Fetching single records is also straight forward. We just need to include the where parameter with a unique field like the id in our example.
const post: Post = await prisma.post({ id: 'cjli6tknz005s0a23uf0lmlve' })Select fields:
By default, we get all scalar fields of our record. If we only want to get specific fields though we need to write our own query fragment which can look something like this.
const fragment = `
fragment UserWithPosts on User {
  id
  email
  posts {
    id
    title
  }
}

const user = await prisma.users().$fragment(fragment)
Here we use the $fragment API to specify the fields we want to query. After that, we fetch the fields using our Prisma service.
Writing data
Now that we know how to read data from our database using the Prisma client let’s move on to writing data to the database.
Creating Records:
When creating new records in the database we use the create() method which takes one input object with all the scalar fields of the record.
Each method call returns a promise for an object which contains all the scalar fields of the model that was created.
const post: Post = prisma.createPost({
  title: 'An Introduction into Prisma',
  author: {
    connect: { email: '[email protected]' },
  },
})
Here we create a new post with [email protected] as our author.
Updating Records:
When updating an existing record we need to use the update() method which takes one input object with two fields:
where— This field is used to identify the record that is going to be updated. You can use any unique field to identify the record.data— An object that contains the scalar fields that will be updated
const updatedUser: User = await prisma.updateUser({
  data: {
    name: 'Test',
  },
  where: {
    email: '[email protected]',
  },
})
Deleting Records:
When deleting one record from the database we use the delete() method which takes an where object as an input.
const deletedUser: User = await prisma.deleteUser({
  email: '[email protected]',
})
Realtime subscription
Now that we know how to define and manipulate data lets take a look at how we can subscribe to database events and receive updates in realtime using the $subscribe property.
The $subscribe property is based on Websockets and is auto-generated for each model type in your datamodel.
Basic subscription:
Subscribe to the create and update events of for our User module.
const createdAndUpdatedUserIterator: UserAsyncIterator = await db.$subscribe
  .user({
    mutation_in: ['UPDATED', 'CREATED'],
  })
  .node()
Subscription with query:
Subscribe to events of a specific user using the node property.
const createdUserIterator = await db.$subscribe
  .user({
    mutation_in: ['CREATED', "UPDATED"],
    node: {
      email_contains: `[email protected]`,
    },
  })
  .node()
If you want more information about the Prisma client you can visit the official documentation.
Prisma server
The Prisma server is an infrastructure component that is connected to your database. It needs to be configured with a database connection and your user credentials before deployment.

The main responsibility of the Prisma server is to translate request made by the Prisma client into actual database queries.
Local setup
The currently recommended way of setting up the Prisma Server is through Docker. This can be done by writing a simple docker-compose.yml file which contains both a config for the Prisma Server and one for our database. After that, you just need to start it using the docker-compose up command.
This can be done using different databases like MySQL, PostgresSQL or MongoDB. Here I show a sample config using MySQL as the database.
version: '3'
services:
  prisma:
    image: prismagraphql/prisma:latest
    restart: always
    ports:
      - '4466:4466'
    environment:
      PRISMA_CONFIG: |
        managementApiSecret: some-secret
        port: 4466
        databases:
          default:
            connector: mysql
            host: mysql-db
            port: 3306
            user: root
            password: root
  mysql-db:
    image: mysql:latest
    restart: always
    environment:
      MYSQL_ROOT_PASSWORD: root
    volumes:
      - mysql:/var/lib/mysql
volumes:
  mysql: ~
Here is a simple docker-compose file which will create two containers:
prisma— Contains our Prisma servermysql-db— Container running a local instance of the MySQL database
The Prisma container uses mysql as its database which it can refer to with its container name.
Demo Servers(Prisma cloud)
Another option is to use Prisma’s cloud service instead of hosting the database and server locally. These demo servers are completely free, but you need a Prisma Cloud account.
These servers have a rate limit of 10 requests per 10 seconds (on average) and can thereby not be used in any production environment. Here are some use cases where it makes sense to use a demo server.
Use cases:
Potential use cases for these servers are:
- Prototyping
- Personal projects without a notable user base
- Learning
We will see how to use a demo server in the CRUD app example below.
Prisma admin
Prisma admin is a way to visually interact with your data and database. It also you to modify existing and add new data to your database using a modern and simple GUI.
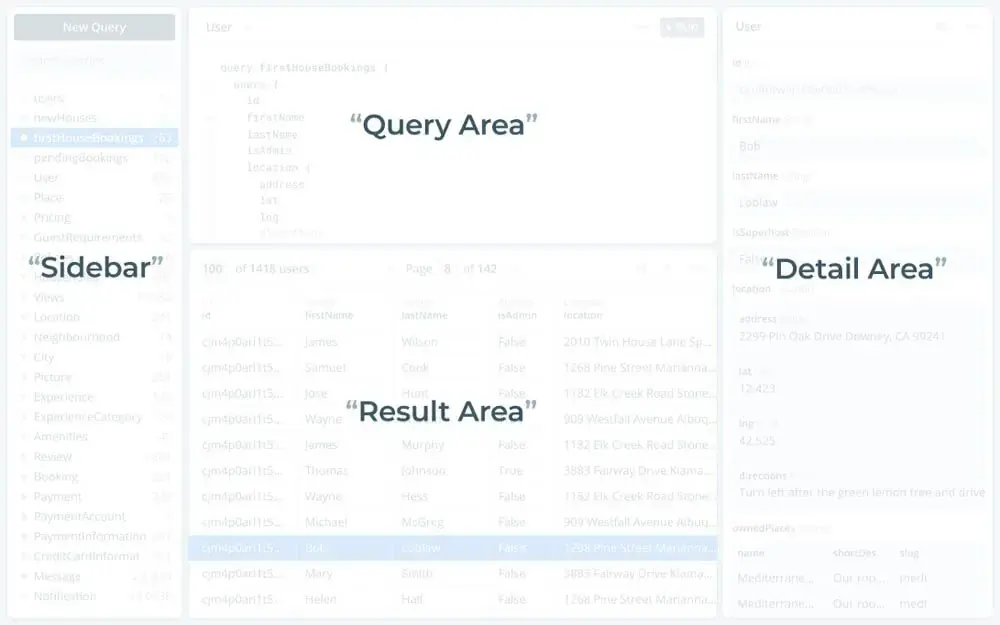
Structure
The Prisma Admin interface consists of 4 main areas:
- Center — Query and result area
- Right — Detail area
- Left — Sidebar
Getting access to Prisma admin
The Prisma admin page is available at the /_admin endpoint of your Prisma service.
For example:
You can find the endpoint of your Prisma service in your prisma.yml file. Prisma admin can also be opened using the prisma admin command in your console.
If you want to try it you can go ahead and open the demo service provided by Prisma themselves.
Writing data
Prisma admin provides a GUI that lets you easily create, update and delete data in your database.
Every database operation is a two-step process:
- Make changes in the Prisma UI
- Once you are done click the Save to Database button in the bottom-right corner
Creating a basic server
Now that we have a theoretical understanding of Prisma and know what it is used for let’s build a simple GraphQL server with it to get a better grasp of the concepts and structure we talked about above.
Setup
Let’s get started by downloading the GraphQL CLI using npm (Node package manager) and setting up our project.
npm install -g prisma graphql-cliAfter that we can create our project by typing:
graphql create primsa-crudThen you will see a selection of project templates that looks something like this.
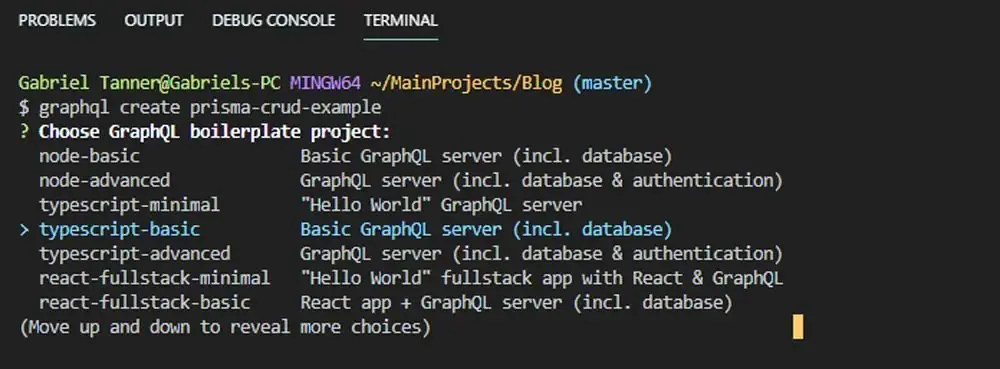
We will choose typescript-basics and continue on by pressing enter. This will create a sample project with one GraphQL type called post and full CRUD functionality.
The folder structure should look something like this.
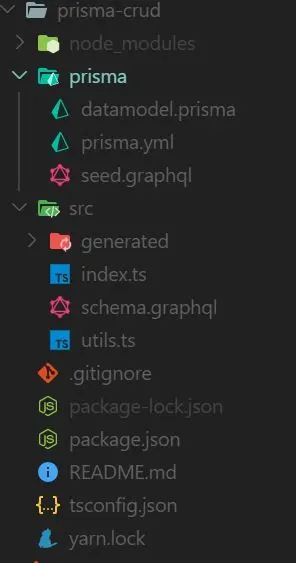
Project structure
Now that we have set up our project let’s investigate the generated files and their roles in the project:
/prisma:
prisma.yml— Root configuration file for the Prisma database APIseed.graphql— Contains mutations to seed the database with datadatamodel.graphql— Contains the data models written in SDL
/src:
index.ts— the entry point to your server which starts the GraphQL server and sets the configurationschema.graphql— Defines the application schema and contains the GraphQL API for the clientgenerated/prisma.graphql— Defines the Prisma schema and all the CRUD functionality which is auto generated by Prisma and should not be edited manually
Datamodel and Schema
The most important files of every Prisma application are the datamodel.prisma and schema.graphql because they define our data model and are thereby the foundation of the API.
Here is what the basic data model looks like:
type Post {
  id: ID! @unique
  isPublished: Boolean! @default(value: "false")
  title: String!
  content: String!
}
Now let’s add a second type to get a good feeling about using the SDL.
type User {
  id: ID! @id
  email: String! @unique
  password: String!
}
Here we just add another type with three fields. We also use the @unique declarator to make sure that every value is only used once in the database.
Now that we have updated the datamodel.prisma file let’s continue by adding the User type and mutations to our schema.graphql file.
type Query {
  feed: [Post!]!
  drafts: [Post!]!
  post(id: ID!): Post
}

type Mutation {
  createUser(email: String!, password: String!): User
  createDraft(title: String!, content: String): Post
  deletePost(id: ID!): Post
  publish(id: ID!): Post
}

type Post {
  id: ID!
  published: Boolean!
  title: String!
  content: String!
}

type User {
  id: ID!
  email: String!
  password: String!
}
Let’s walk through the code:
- We define the user type using standard GraphQL syntax
- Add the
createUser()function to our mutations - Add a users query which will get all previously saved users
Query and Mutation implementation
Now only the implementation of our resolver function remains. So let’s implement them in our index.ts file.
const resolvers = {
 Query: {
  ...,
  users(parent, args, context: Context) {
   return context.prisma.users()
  },
 },
 Mutation: {
  createUser(parent, { email, password }, context: Context) {
   return context.prisma.createUser({ email, password })
  },
  ...
 },
}
Here we create two resolver methods which both invoke a method generated by the Prisma client instance which is called prisma and attached to the context object.
Deployment and testing
Now that we have finished our application we just need to deploy it to a demo server and test it using the GraphQL Playground. We can do so using the following command.
prisma deployIf a dialog appears you need to choose Demo server and the location with the best ping. Then you need to register an account on Prisma cloud and connect it.
After that is done you can run your application using this command:
yarn start
or
npm run start
Your application should now be running and you should be able to visit the GraphQL playground on http://localhost:4000.
Now we can test our queries and mutations:
Create Post:
mutation {
  createDraft(
    title: "Prisma is a great and easy tool",
    content: "It really is."
  ) {
    id
    title
    content
  }
}
Create User:
mutation {
  createUser(
    email: "[email protected]",
    password: "test123"
  ) {
    id
    email
    password
  }
}
Get all users:
query{
  users{
    id
    email
    password
  }
}
If you have any problems or questions feel free to leave them in the comments below. The whole code can also be found on my Github.
Conclusion
You made it all the way until the end! Hope that this article helped you understand the basics of Prisma and why it is so useful to us backend developers.
If you have found this useful, please consider recommending and sharing it with other fellow developers. If you have any questions or feedback, let me know in the comments down below.