Most Linux users spend the majority of their time working in a terminal and want to get the most productive and enjoyable experience possible. OhMyZsh is an open-source tool for managing Zsh configuration that lets you customize your terminal to your liking and adds useful plugins and helper functions that improve your productivity and make using the terminal more enjoyable.
In this article, you will learn how to set up OhMyZsh with the solarized Agnoster theme and install useful plugins that provide functionality, including auto finishing already used commands, googling from within your terminal or copying entire files. Below is a screenshot of how your terminal will look at the end of the article:

Table of contents
Open Table of contents
Installation
Let’s start by installing OhMyZsh on our machine, so we can continue customizing our terminal. But before we can install OhMyZsh you first need to make sure that you have Zsh installed. If not, you can run the following command to install it.
sudo apt install zshAfter Zsh is installed on the system you can use the following command to install OhMyZsh using the official installation script.
sh -c "$(curl -fsSL https://raw.github.com/ohmyzsh/ohmyzsh/master/tools/install.sh)"You have successfully installed OhMyZsh and it is time to continue by installing our terminal theme.
Configure Agnoster theme
Now that Zsh and OhMyZsh are installed, you can continue by configuring your terminal theme. For this, you first need to download a font that supports the unique characters and icons used by the theme.
sudo apt install fonts-powerlineAfter installing the font, you can enable the Agnoster theme by changing the ZSH_THEME variable inside the ~/.zshrc configuration file.
ZSH_THEME="agnoster"Downloading solarized theme
After downloading the Powerline font and enabling the Agnoster theme you can also download and install a terminal theme for the background and font colors. I personally use the Solarized terminal color theme, but there are also alternatives like the Dracula or Gogh theme.
The following commands can be used to install the Solarized theme:
git clone https://github.com/aruhier/gnome-terminal-colors-solarized.git
cd gnome-terminal-colors-solarized
./install.sh
Fixing font
If you are still having issues where special characters and icons are not displayed correctly, I recommend downloading another fixed version of the font instead. I tried a lot of options and the Menlo-for-Powerline font seemed to work best for me.
To use this font you will first need to download it from the Menlo-for-Powerline Github repository.
git clone https://github.com/abertsch/Menlo-for-Powerline.gitAfter downloading you can add the font to your fonts folder.
cd Menlo-for-Powerline
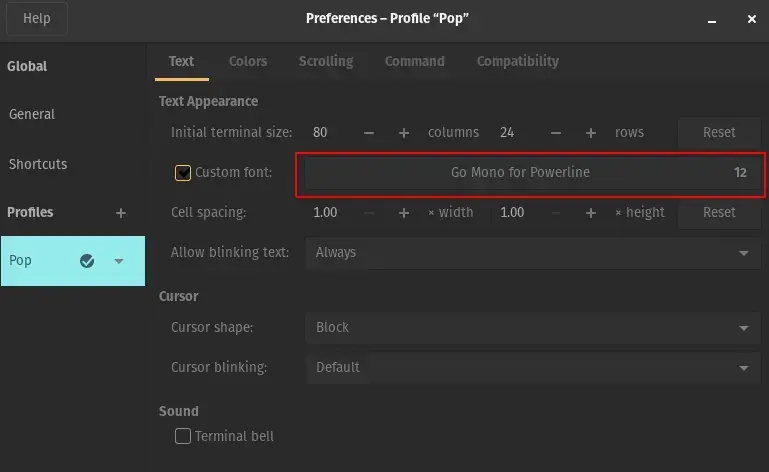
cp "Menlo for Powerline.ttf" ~/.fontsLastly, you will need to select the font in your terminals preferences, which depending on your operating system might look similar to this.
Fixing the font in VSCode
If you are using VSCode you will also need to set your fontFamily to the font you want to use. To do so you can search for “Preferences: Open Settings (JSON)” in the command palette and add the following line to your configuration.
"terminal.integrated.fontFamily": "Menlo for Powerline",Note: If you are using a different font don’t forget to change it here.
Change the prompt context
As with most default terminals OhMyZsh also displays the system and username next to your directory by default. This can be useful in some cases, but it is usually useless information and can be removed for a cleaner look.
If you want to remove both the system and username from your terminal you can add the following line to your ~/.zshrc configuration.
prompt_context() {}Another option is to change the context to something more appropriate for your use case. I prefer to have some emojis because it gives the terminal a warm and comfortable look.
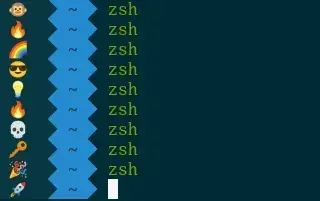
This can be achieved by adding the following code block to your ~/.zshrc configuration.
prompt_context() {
  # Custom (Random emoji)
  emojis=("⚡️" "🔥" "💀" "👑" "😎" "🐸" "🐵" "🦄" "🌈" "🍻" "🚀" "💡" "🎉" "🔑" "🇹🇭" "🚦" "🌙")
  RAND_EMOJI_N=$(( $RANDOM % ${#emojis[@]} + 1))
  prompt_segment black default "${emojis[$RAND_EMOJI_N]} "
}
Adding plugins to customize your terminal
Plugins can be added to further customize your terminal and add useful extra functionality, including:
- Automatically finishing commands
- Googling from within your terminal
- Copying entire files
- Adding shortcuts for often-used commands
Useful plugins
Before showing, you how to install and configure a plugin here is a list of useful plugins that I personally use and you might want to include in your configuration.
- zsh-autosuggestions - Suggests Commands as you type based on your personal command history
- zsh-syntax-highlighting - Basic syntax highlighting in the shell
- sudo - Shortcut for adding sudo to your previous command
- web-search - This lets you search with popular search engines from your terminal (e.g. google WebRTC)
- copydir - Copies the path of your current folder to the clipboard
- copyfile - Copies an entire file to the clipboard
You can find more plugins here:
Installing an external plugin
Some plugins come with OhMyZsh by default and just need to be enabled in the config. Others need to be installed before being usable like the zsh-autosuggestions for example.
Installing is pretty simple because you only need to clone the repository into the Zsh plugin directory. Here is what that would look like for the zsh-autosuggestions plugin.
git clone https://github.com/zsh-users/zsh-autosuggestions.git $ZSH_CUSTOM/plugins/zsh-autosuggestionsAdding the plugin to your configuration
Adding a plugin can be achieved by adding the plugin name to the plugins variable in the ~/.zshrc configuration file.
plugins=(git zsh-autosuggestions zsh-syntax-highlighting sudo web-search copydir copyfile)Once you added the plugin you will have to restart your terminal and you should be able to use the added functionality. For example, after adding the web-search plugin you should be able to type google WebRTC into your terminal and a Google window with the search term WebRTC should open.
Complete Configuration
Here is the complete configuration of all that was shown in the article:
# If you come from bash you might have to change your $PATH.
# export PATH=$HOME/bin:/usr/local/bin:$PATH

# Path to your oh-my-zsh installation.
export ZSH="/home/gabriel/.oh-my-zsh"

# Set name of the theme to load --- if set to "random", it will
# load a random theme each time oh-my-zsh is loaded, in which case,
# to know which specific one was loaded, run: echo $RANDOM_THEME
# See https://github.com/ohmyzsh/ohmyzsh/wiki/Themes
ZSH_THEME="agnoster"

# Set list of themes to pick from when loading at random
# Setting this variable when ZSH_THEME=random will cause zsh to load
# a theme from this variable instead of looking in $ZSH/themes/
# If set to an empty array, this variable will have no effect.
# ZSH_THEME_RANDOM_CANDIDATES=( "robbyrussell" "agnoster" )

# Uncomment the following line to use case-sensitive completion.
# CASE_SENSITIVE="true"

# Uncomment the following line to use hyphen-insensitive completion.
# Case-sensitive completion must be off. _ and - will be interchangeable.
# HYPHEN_INSENSITIVE="true"

# Uncomment the following line to disable bi-weekly auto-update checks.
# DISABLE_AUTO_UPDATE="true"

# Uncomment the following line to automatically update without prompting.
# DISABLE_UPDATE_PROMPT="true"

# Uncomment the following line to change how often to auto-update (in days).
# export UPDATE_ZSH_DAYS=13

# Uncomment the following line if pasting URLs and other text is messed up.
# DISABLE_MAGIC_FUNCTIONS="true"

# Uncomment the following line to disable colors in ls.
# DISABLE_LS_COLORS="true"

# Uncomment the following line to disable auto-setting terminal title.
# DISABLE_AUTO_TITLE="true"

# Uncomment the following line to enable command auto-correction.
# ENABLE_CORRECTION="true"

# Uncomment the following line to display red dots whilst waiting for completion.
# Caution: this setting can cause issues with multiline prompts (zsh 5.7.1 and newer seem to work)
# See https://github.com/ohmyzsh/ohmyzsh/issues/5765
# COMPLETION_WAITING_DOTS="true"

# Uncomment the following line if you want to disable marking untracked files
# under VCS as dirty. This makes repository status check for large repositories
# much, much faster.
# DISABLE_UNTRACKED_FILES_DIRTY="true"

# Uncomment the following line if you want to change the command execution time
# stamp shown in the history command output.
# You can set one of the optional three formats:
# "mm/dd/yyyy"|"dd.mm.yyyy"|"yyyy-mm-dd"
# or set a custom format using the strftime function format specifications,
# see 'man strftime' for details.
# HIST_STAMPS="mm/dd/yyyy"

# Would you like to use another custom folder than $ZSH/custom?
# ZSH_CUSTOM=/path/to/new-custom-folder

# Which plugins would you like to load?
# Standard plugins can be found in $ZSH/plugins/
# Custom plugins may be added to $ZSH_CUSTOM/plugins/
# Example format: plugins=(rails git textmate ruby lighthouse)
# Add wisely, as too many plugins slow down shell startup.
plugins=(git zsh-autosuggestions zsh-syntax-highlighting sudo web-search copydir copyfile)

source $ZSH/oh-my-zsh.sh

# User configuration

# export MANPATH="/usr/local/man:$MANPATH"

# You may need to manually set your language environment
# export LANG=en_US.UTF-8

# Preferred editor for local and remote sessions
# if [[ -n $SSH_CONNECTION ]]; then
#   export EDITOR='vim'
# else
#   export EDITOR='mvim'
# fi

# Compilation flags
# export ARCHFLAGS="-arch x86_64"

# Set personal aliases, overriding those provided by oh-my-zsh libs,
# plugins, and themes. Aliases can be placed here, though oh-my-zsh
# users are encouraged to define aliases within the ZSH_CUSTOM folder.
# For a full list of active aliases, run `alias`.
#
# Example aliases
# alias zshconfig="mate ~/.zshrc"
# alias ohmyzsh="mate ~/.oh-my-zsh"

prompt_context() {
  # Custom (Random emoji)
  emojis=("⚡️" "🔥" "💀" "👑" "😎" "🐸" "🐵" "🦄" "🌈" "🍻" "🚀" "💡" "🎉" "🔑" "🇹🇭" "🚦" "🌙")
  RAND_EMOJI_N=$(( $RANDOM % ${#emojis[@]} + 1))
  prompt_segment black default "${emojis[$RAND_EMOJI_N]} "
}
Sources
Here is a list of resources used to write this article:
Conclusion
In this article, you set up OhMyZsh and customized your terminal to your own liking. You also installed plugins to automate your work processes and make you more productive.
Please consider recommending and sharing it with other fellow developers and subscribing to my newsletter if you have found this helpful. If you have any questions or feedback, let me know using my contact form or contact me on Twitter.